Here we go fellow woodworkers! I started up my Dovetail-a-day plan on 1/1/13…not
so much as a New Year’s resolution, rather giving myself a clear run of
non-travel days that should find me home and in the shop for the next few
weeks.
This post is pretty picture-intensive to show the tact I’m
starting with for cutting my dovetails.
Future posts will just include updates of my progress, and any changes I
make to my technique…maybe driven by suggestions from any of you dovetail gurus
out there (hint hint!) J
The last time I attempted hand-cut dovetails was probably
about seven or eight years ago when my Dad gave me a lesson during one of our
trips back east. I think I cut about a
dozen joints during that visit and actually got some pretty good results. I haven’t hand cut any since that trip, so
this new venture is heavily laced with some very sweet memories of my Dad.
Earlier in December I picked up some 1X6 pine boards (3/4” X
5 1/2") from Home Depot to use as practice stock. Yesterday morning I broke the boards down to
one foot lengths. Each pair of boards
should allow me to make three or four practice joints each.
With my first pair of boards selected I laid out the tools I’ll
need to get the action started. I’ve got
my Veritas Dovetail Saw (14 tpi) and the Crosscut Saw ready to go. I’m using a round bladed marking gauge and my
Dad’s old Lie-Nielsen dovetail marker for laying out the joints. I’ll also be using my Stanley Sweetheart (750)
chisels…a gift from my parents from a couple Christmases back.
My first step is to lay out the tails. I know that this will cause some immediate controversy,
but it’s what made sense to me. J I set the marking gauge to the thickness of
my boards. Since both boards are the
same thickness there will only be this one setting.
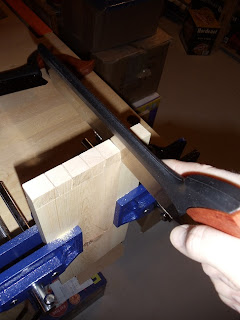
I decided to cut a three tailed joint. This gives me plenty of room to work around the tails while I’m rebuilding my “chops.” I set a tail an inch in from both sides and centered the third. Then I marked the waste to protect me from myself!
After the layout it was time to dig in and make some cuts. My first attempts with Dad were with a Japanese style pull-saw, so this is my first time using the western style dovetail saws. So far I like both methods. Perhaps I’ll experiment with the Dozuki again in the future.
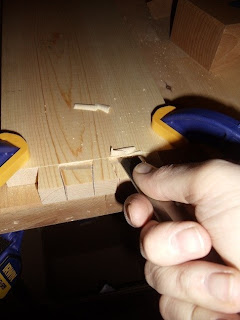
With the sides of the tails cut, it was time to go after removing the waste. I know that quite a few folks will use a coping or fret saw here, but I’m going to chop out the waste with chisels. This is a handy trick that Dad showed me all those years ago. By using the chisel to pare out a small wedge, a little “wall” is created that gives the saw a guide to start making a straight cut. The scribed line from the marking gauge does double duty here by providing a resting place for the chisel’s edge to sit in before striking it with the mallet. The wedge is then removed with a light paring cut.
This technique worked really well for me. It’s amazing how just a tiny, little shoulder is enough to guide the saw true when starting the cut.
I didn’t catch a photo, but did use this same technique to create those little “walls” when I started chopping out the waste from between the tails.
I alternated paring cuts and chopping cuts until I was about halfway through the board. I then flipped the board over and worked from the other side. Once most of the material was removed from around the base of the tails, the rest of the waste popped right out.
After a little clean-up with the chisels I used the tail board to mark the location of the pins on the second work piece.
I then followed all of the same procedures to cut the other half of the joint in the pin board…and here it is, my Day One efforts at hand cutting dovetails.
There are some gaps, and I can see where my saw cuts were not a true as I would have liked. I was pleased with my layout though. I can actually flip the tail board over and tails will match up with the pins. It’s not a perfect fit because of the variations created by my sawing, but the joint will slide together about half way and the edges are still aligned. One thing I did forget to do was time myself. I'll have to put a clock on my efforts going forward to measure any increase in efficiency as well as precision.
This was a great experience and I’m looking forward to practicing
a lot more. I thought about Dad and
missed him a lot while working on these. All that I remembered made me feel better and
prouder than even the most perfect dovetail joints could.
I’d love to hear some feedback or input on my
technique. I know that there are many
methods out there and that folks use all kinds of variations to produce amazing
results. Thanks for visiting, and come
on back!Pete


6 comments:
Your results speak for themselves! That's a fine looking joint. I'm glad you chose to make multiple tails too. So many of the dovetail a day folks I see are making only a single tail joint and this is much easier than the multiple tail ones where errors can compound.
Your method for chopping is the same one I was taught by Chuck Bender and it works great. One thing to remember though with a soft wood like Pine is that you may still need to step away from the wall for the first couple chops. The soft wood will still deform if you drop the chisel right into that narrow wall. That may explain those small gaps on your baselines. Other than that, leave the stopwatch in the house, this isn't a race and why add stress to the exercise. Your dad would be proud.
Thanks Shannon! I'll try that. I have been tilting the chisel in just a hair on my latest joints and that has seemed to help a bit. I'll try stepping away a bit as well.
My bigest struggles are with cutting straight and starting the cut. I guess that's why we practice! :)
Hi, Its' Fay from precisionbits.com. Wow - I'm quite impressed with your work. Would you be interested in doing a review of some of our router bits? I would be happy to send them your way. Perhaps you can incorporate a couple of the bits into your project. Let me know. you can reach me at fay@precisionbits.com
Thank you Fay! I'd be honored to take some bits from Precision for a "spin!" :) I've got several projects on the list that will require quite a bit of router use so I should be able to give them a good workout. E-mail sent, and thanks again!
It looks so great. You're so handy.
The results are impressive - well done! I think you did a great job here using the wood tool you used.
Post a Comment