Ah…four days to stretch out and tinker in the workshop…four days to play with some designs and try some new things…four days to…what? Wait a minute! What do you mean it’s over already?!
I’ve been on Google, Bing, Ask.com and the Weather Channel…no jumps, holes or blips in the space-time continuum, so I guess it’s true…four days have really already flown by! Fortunately I did get to spend some time in the shop and was able to play with some new tools and techniques.
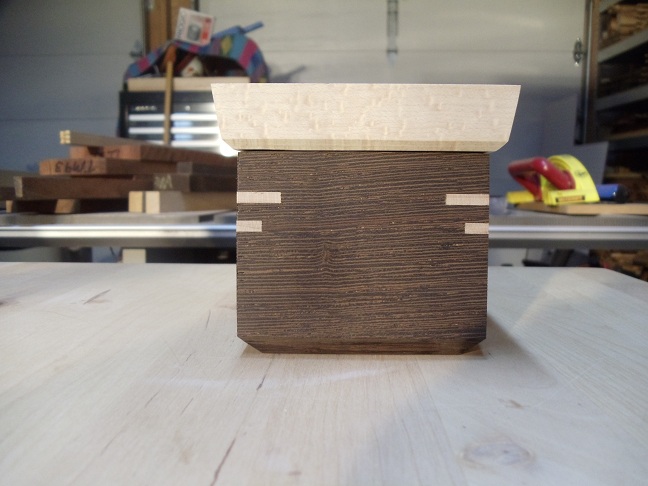
My big project for the long weekend was to design and build some custom lids for two Birds-eye Maple boxes I made a couple months ago when I was in a box-making, berserker rage…frenzy…thing. After several sketching sessions I landed on a Wenge, lift-off lid with a bent lamination handle of Wenge and Padauk.
I’m thinking about utilizing a small mortise and tenon at the base of each end of the handle. I’ll see how that works out after I’ve laminated the form. You can see where I marked them in on the sketch.
Originally I was a little torn over the thickness of the lid, so I picked out a slab of quarter-sawn Wenge that would yield enough for a 1/4 inch thick piece and a 3/8 inch thick piece when resawn on the band saw.
Now this falls into the “I’m a Big Dummy” category. After resawing the Wenge slab I noticed that my cut line didn’t come out very vertical.
Throwing a square up to the blade revealed that it was quite a bit off square from the table! (Insert “I coulda had a V-8” slap to the head here!)
I was lucky that, after face jointing and planning, I was still able to get the 1/4 and 3/8 inch pieces. After placing each version on the box, I’ll definitely be going with the 3/8 inch lid. I like the heaver look and I’ll need some thickness to work with to cut the rabbet that will fit into the box top and for the mortises needed to attach the handle.
For the lid handle I decided on a bent laminated arc of alternating strips of Wenge and Padauk. I had found a great video on You Tube demonstrating how to safely rip thin strips on the table saw, and was ready to build my own jig when I saw a link to another video demonstrating the use of Rockler’s Thin Rip Table Saw Jig. Not only is Rockler less than 20 minutes from the house, but their jig was on sale. After a quick field trip for Danger Boy and I, we were the proud owners of our own jig (and a few other items that Mommy doesn’t need to hear about.)

The jig locks into the miter slot to the left of the blade and the guide plate slides perpendicular to the blade. The jig is set so that the bearing at the “point” of the guide plate contacts the wood and determines the width of the strips. I set the jig to cut 1/16 inch thick strips. After each strip is cut, the rip fence is moved to the left until the work piece contacts the bearing…then rip again. No measurements needed after the jig is set…very easy and very safe. I highly recommend this jig from Rockler. You could make your own, but it’s only $20 and is rock solid when it’s locked down. As an aside, a zero-clearance insert is a must here to ensure your thin strips don’t drop into the insert opening and bind up with the blade, or worse, become a missile.

The Padauk slab I used has a small section of white sapwood, so I made sure to cut some strips that showcase the contrast with the rusty, red heartwood. I’ll laminate two strips of Wenge with three strips of the Padauk, with the heartwood/sapwood combo strip on top.
I cut enough for three bundles of 18 inch strips which is well more than I need. After cutting them in half I’ll have enough for six handles to experiment with. Having a few extra should come in handy as I think that little tenon piece could get tricky to fit.
With the lid and handle stock milled and cut to size, it was time to venture into new territory. I’ve never done bent lamination before, however I’ve wanted to try it for some time now. I’ve seen lots of great examples, demos and videos, but I was really inspired by Neil Lamen’s videos over at his blog/podcast http://furnitology.blogspot.com/. I was watching some of his older video podcasts a couple weeks ago and was really inspired to break out and try some new stuff, and really start pushing myself. Thanks Neil! The first thing I tackled was playing with the arc of the handle a bit. I sketched what I thought was a pleasing looking arc, but the more I looked at it, the lower I thought it should be. I used an extra Padauk strip and some string to experiment with different heights and ended up bringing the highest point of the arc down a little from my original design.
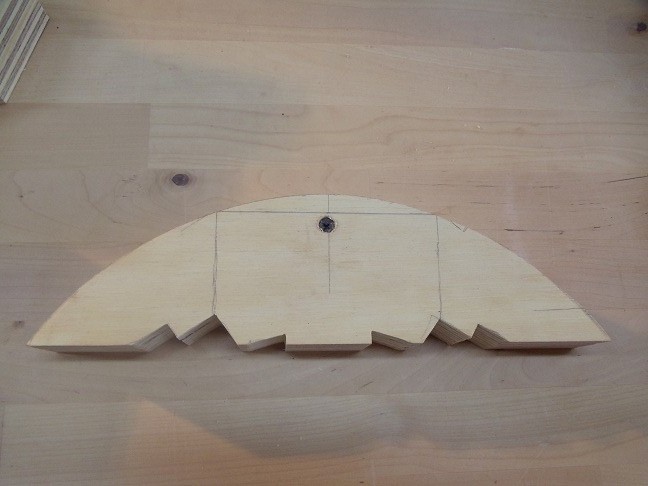
Once I was happy with the design layout on the piece of plywood that would become part of the bending form, I doubled up the thickness of the form by gluing and screwing two plywood slabs together, and marking the waste side of the form.
After letting the glue set for an hour I cut out the form over on the band saw, and then smoothed the surfaces of the arc on the oscillating belt sander.
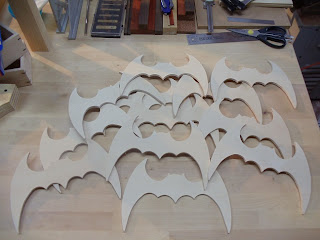
After a little experimenting with clamp placement I cut some strategic notches in the form to maximize clamping pressure. Danger Boy exclaimed that it looked like Batman’s boomerang and asked if I can make another one for him…and then he moved on to skateboarding with the neighbor…whew!
After a quick test run with a stack of the strips…
…I attached the arc form to a flat plywood base with glue and screws and lined the surfaces with wax paper (to keep the glue from adhering to the form during the lamination process.)
Once everything was set, it was time to bite the bullet and glue up a set of the strips. Here they are, clamped up at seven points. You can see the portion of the arc that will be used between the two vertical lines drawn on the form. These points will be the beginning of the flat base that will make contact with the surface of the lid.
This brings us to the end of our four day weekend. Stay tuned for more to come. I’ll pull the glue-up from the form and work on the joinery and shaping later this week…and evidently I’m now in the business of arming Batman. Man, it was so much easier when he was Spiderman!
Pete