Pages

Saturday, September 29, 2012

Interview with a Master

September 20, 2012 was a sad day for members of the online woodworking community when we lost a fellow woodworker whose passion for the craft was intense and contagious.  Neil Lamens (http://furnitology.blogspot.com/) was about as fired up as anyone could get about woodworking, design and pushing the craft forward.   I only knew him through our online interactions, but his zeal came through in every post, video and e-mail.  Neil was incredibly generous with his encouragement, critique and wisdom.  He answered every question I ever threw at him and he LOVED engaging with folks who were new to the craft or were stepping outside of their comfort zones for the first time.  Talk about having an inspiring cheerleader on your side!  He was a class act through and through.

You can still hop over to Neil’s blog site and check out his videos and articles.  He did a great series of videos on a Carlo Mollino inspired table that is still one of my favorite online videos.  I think I’ve gone back and watched it three times over the years.  Today I wanted to share a video Neil did with famed furniture designer and sculptor, Wendell Castle.  It’s always interesting to hear directly from people who are considered masters of their craft, yet part of what makes this interview so fun is the experience that you can see Neil having.  He’s so appreciative to be sitting across from one of his heroes and you can just see it in his face.  Enjoy this two part interview with an icon of design…


Be sure to poke around the rest of Neil’s posts too.  He put a lot of great content up on woodworking and design over the years.

Amazon is going to get some business from me today.  Neil recommended a couple books to me and I’ve had them on the wish list for a while now.  Time to pull the trigger and dig into some design history and philosophy.

RIP Neil.  We’ll all miss you.

Pete

Sunday, September 23, 2012

Keep the Ball Rolling


It’s been a bit of a crazy week here in the Second Wind Workshop…busy at work and a houseful of sniffling, sneezing, coughing, aching…you get the picture.  I’ve been able to squeeze in some shop time though to keep the project list moving along.  I also received some great feedback from my fellow woodworkers in the online community on keeping things fresh, staying inspired and managing project time.  There really are a lot of amazing, talented (and generous!) folks putting themselves out there and sharing their skills and experiences without any reservations.  THANKS!

My go-to finish is usually some kind of wiping varnish or a Danish Oil finish.  I like the control one gets with a hand applied and rubbed finish, however it does require a bit more of an investment in time.  A few days ago I decided to give a sprayed lacquer finish a try for the first time.  I opted to try a canned finish as I’ve seen quite a few folks online have some really nice success on their projects. 

I chose Deft Clear Wood Finish (Satin) to try on two of the Oak and Sapelle candle holders.  I set up a make-shift spray area on the kindling box on the back patio and went at it.
 
After the first few light coats I was really pleased with how they were turning out.  These will require only a light sanding with some 320 or 400 grit sandpaper to clean them up before applying the final coat.

I’ll experiment with spray finishes a bit more on a few more small projects, and then I’ll have to take a serious look at a spray gun to use with my air compressor.

While the lacquer was curing on these two candle holders I turned my attention to the break-down version.  I’ll build a small box, also from the repurposed Oak, to contain both the holder and a small supply of the tea light candles.  The long base piece is the guiding part that will decide the minimum dimensions of the box.  With the pieces stacked like this I’ll be shooting for an inside dimension of ten inches long, two inches wide and two inches tall.
 
These dimensions will leave enough room for six of the candles to accompany the holder.  The box will be made from some of the stock that was milled to 3/8 inch thick.

Over the past several weeks I’ve been pressing veneered panels in several different species.  I've amassed quite a little collection of pieces ready for use in box lids or maybe even some paneled doors.

I had hoped to use panels pressed with this stunning Walnut burl.  I thought the color contrast would pair well with the subdued tone of the Oak, and the wild grain pattern would be framed nicely by the straight grain in the body of the box.

Unfortunately, when I pressed these sheets onto the 1/8 inch MDF substrate some of the cold press glue squeezed through the open grain and glazed onto the show surface of the veneer.

There was quite a bit of glue that came through…more than enough to eliminate any continuous piece long enough to serve as the lid panel for the candle holder’s storage box.   I’ve done some sanding (wet and dry) to see how much I can salvage, but I’m worried about the thickness that will be left as I continue to work these panels.  I may be able to salvage some smaller portions for use in smaller boxes though.  I’m wondering if there is a way to seal or size the surface to be glued down to the substrate in advance.  (A little research project to be undertaken…I’ll keep you posted.)

I’ve decided to use the panel that presents the strongest color contrast with the Oak, the Sapelle.
 
It won’t provide the same drama that the Walnut would have, but the beeswing figure should still look very nice once it’s been oiled, waxed and buffed.

Just rolling with the punches and rolling through the list.
Pete

Tuesday, September 18, 2012

Break it Down


Project momentum continues to build here in the Second Wind Workshop.  The squirrels have been kept at bay!  J

We have a confirmed sighting of a finished project.  It’s a small one, but a done one!  I present to you the Break Down Candle Holder.

Again, I’d like to give a shout out to Steve Ramsey over at www.woodworkingformeremortals.com for the initial design.  Click on over to his sight for some great project ideas and a little wackiness.  Thanks Steve!

Here we have all the parts stacked up neatly.
 
The three cross members are dropped down onto the bridle joints of the longer base piece.  All of the base pieces are made with salvaged Oak from a set of old dressers.

The fit is a little looser than I’d like but it still comes together well.  I lost a shade more of the thickness than I wanted to when sanding the parts.  I’ve locked that tid-bit of learning away for future builds.

The little platforms to hold the tea light candles are Sapelle and click right into place when the rare-earth magnet engages the head of the tack in the small cross members.

While you can’t turn the whole assembly completely upside down it does hold together quite well due to the magnets and the natural friction between the pieces.
 

Here it is all lit up.

Workshop mood lighting anyone?

I really like how the Danish Oil brought out the warmth in the Oak and the deep, rusty red of the Sapelle.  I hand rubbed four coats of the oil finish with some light sanding and then buffed the final coat with a rag.

One project down!  Next up...the fixed versions of this same candle holder.
Pete

Sunday, September 16, 2012

A Little Attraction


About a week ago the gang over at www.woodworkingtalk.com were discussing how many of us woodworkers seem to have multiple projects going on at the same time.  There were several reasons mentioned from short attention spans (“was that a squirrel?”) to stocking up on products to sell, or the mounting pressure to start attacking the long list of Christmas presents that are expected from family and friends. 

At first I thought, “Well I’ve only got two things going right now…oh no wait, three…unless I count those Padauk boxes, so that would be four…and then there’s the…”   I finally landed on a count of eight different projects in various stages of completion in the works right now so I had to take a step back and ponder why it’s so easy for us (me) to start a new project before a current one is complete. 

Some aspects may remain an unsolved mystery (“Oh look, another squirrel!”) however, for me a lot of it is timing.  There are times when I only have a short time to work in the shop, so I’ll look to smaller projects to get my fix in.  Then there are times when I’ve got a day or two to spend down in the shop so the fervor to start something more substantial sets in.  Time of day also plays into the story.  With a napping baby or an 8:00 bedtime for Danger Boy, running the jointer or table saw is sometimes frowned upon.  Don’t mess with Mom and the serenity that comes with sleeping boys.  Just pull out the sandpaper or Danish Oil and keep it down!

With this deeply philosophical question rattling around my brain I’ve challenged myself to start working through my list of open projects to bring them to a close.  First up…the Oak candle holders.

I had decided to construct one of these candle holders with a break-down configuration.  After cutting the small cup shape in the candle platforms I flipped one set over and cut some shallow 1/4 inch wide holes on center.
 

These little pockets are sized to receive some small rare-earth magnets.  A little dab of Super Glue gel and they are locked in for good.
 
I then drilled a small counter-sink and pilot hole into the tops of the shorter base pieces.


Another few drops of the Super Glue and a couple taps with a tack hammer and these small carpet tacks are seated nice and flush.
 
Even though these magnets are small they really pack a lot of attractive strength.  Once they connect with the head of the carpet tacks these small platforms lock down onto the base quite nicely.  You really have to jolt the platforms pretty hard to break the magnetic bond, so these should do a great job in keeping the holder together and ensuring that the candles don’t tip over or spill when moved or bumped.


I’ll be applying a hand-rubbed, Danish Oil finish to this breakdown set.  Once that’s cured and buffed out I’ll send this one on its way to its new home.

The remaining four candle holders will be permanently joined.  Two will have this same clean-lined, simple symmetrical configuration, while the other two will receive a bit of experimental shaping to change the form up a little.

Stay tuned…the Danish Oil that I’ve applied to a couple scrap, test pieces revealed some great color and tone to both woods in this design.

Pete

Monday, September 3, 2012

God Speed Dad


On July 26th I lost my hero and mentor, my Dad, CMSgt Robert D Harbin.  He was a 30 year, Air Force veteran who loved his family, friends and serving his country.  Like many boys can I could brag about my Dad all day long and then some.  I had the honor of delivering his eulogy at his memorial service back home and the days spent preparing were filled with many tears, laughs and sweet memories.  While I spent those remarks on his love for my mother, my sisters and I, his brothers and sisters and his deep love for our country and those he served with I wanted to take a moment here to share a small sampling of his woodworking portfolio. 

Dad really enjoyed being out in the shop and his dedication to craftsmanship and learning was voracious.  He’s the reason that I began to dabble in woodworking, and the more time I spent working with him and learning from him, the greater my passion for the craft became.  For almost 20 years, every visit back home included several days in the shop and instruction from him on some technique, or a shared lesson on something we both wanted to learn.  The day we produced shavings with his LN No.4 that were so light they floated on air will be vivid for me forever.  I think we both actually giggled.

There are many years worth of work that I just don’t have pictures of, but I was able to find these shelves that were part of his earliest efforts.
 
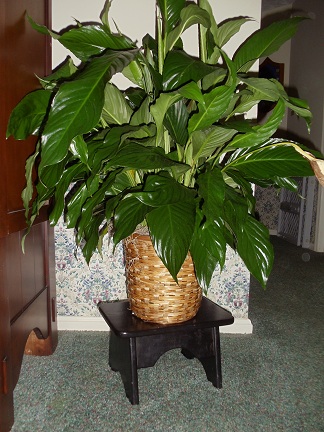
About 99% of Dad’s work was done gratis.  There are probably at least a hundred folks out there in the world with one or several pieces of his work…one of the most desired, this simple footstool.  You may recognize this as the Kreg Jig stool.  I wouldn’t be surprised if there were four or five dozen of these out there, of various sizes and finishes.


Both Mom and Dad really appreciate Country and Shaker style furniture.  Here are a couple examples from the downstairs bathroom.
 

I believe that three of these Shaker Chimney Cupboards were built about ten years ago…
 
…and that four or five of these Shaker Clocks were done back in 2004.


Dad also made a couple other forays into building clocks.  Again, dozens were made to satisfy the high demand from family and friends.

These Mission style clocks were made with a cherished collection of wormy Oak that Dad and his good friend, Ray, bought from a local Amish community lumber mill.
 
He also started branching out into more modern designs.  I believe that this one was an old Wood Magazine design, made from Cherry (also from his good Amish friends) with Dutchman inlays of Cocobolo.


This wine rack was also a bit of a deviation from the Country/Shaker style…with the extra treat of a Walnut Dutchman inlay.
 
Moving back into the Shaker vein, many of these pieces were very popular with the family and friends local to the Maryland/Virginia area.

These wall cabinets became the go-to wedding gift for nieces, nephews and friends.  Of course a few were made for Mom as well.  Over the years, many were made from Walnut, Maple, Cherry and Oak.  This one that hangs in the master bedroom back home is made of Pine and Mahogany (salvaged from old railroad car floor boards.)
 
Here’s a reproduction of the Pleasant Hill Shaker side table, in Walnut, found in the guest bedroom.  Note the presence of one of the modern Cherry clocks and a Cherry step stool.


A couple more Shaker Stool styles that also made the most popular list with the regular cast of recipients…
 
Dad also experimented with a more modern design of the sliding dovetail, high backed step stool, seen here in the wormy Oak…paired with another one of the Kreg stools.

A good portion of that wormy Oak was also used in this tool chest that used to house Dad’s chisels, smaller planes and marking/measuring tools.  When he closed up shop a couple years ago Mom commandeered this piece as storage for table linens.

Inspired by an article on routed bowls, many of the ladies in our family received a pair of these Maple and Walnut pieces for Christmas a few years back.  I remember taking a road trip out to a local mill in the middle of the Maryland countryside to select the stock used to make these.
 
We also picked out several of the slabs on that trip, that were to become these stunning, end grain cutting boards.  Even as recently as last year there were rumblings from those who hadn’t received cutting boards yet!  J

Mom is a big fan and collector of Harbor Lights pieces.  Dad built these bookcases for additional storage in the breezeway room and to display Mom’s collection of favorite lighthouses.

Dad also experimented with a few different frame styles to display some of Mom’s lighthouse prints.

Of all the pieces that Dad had become “famous” for, perhaps none was more desired and appreciated as the collection of wooden cars.  There is not a grandchild, child of niece or nephew or child of family friend that had not received a collection of Grandpa’s/Uncle Bob’s cars and trucks.

The proof is in the pudding…our youngest son and Dad’s last grandchild was doing some serious trucking today as I was writing this entry.
 
Along with many tools and a collection of wood, there are several boxes of car parts and templates back in Dad’s old shop.  I’ll make the trip out to Maryland soon to pick up many of these treasures and bring them into my own shop.  The torch has now been passed to me as the toy car supplier for the family.  I hope I can give as much joy as Dad did over all these years.

And finally, I give you one of my favorite pieces…one of my most favored gifts that I’ve ever received.  Many years ago Dad honored me, on Christmas day, with his father’s flag in a display case that he built in his small workshop down at his parent’s old house on the Potomac River.  I was speechless when he gave it to me and told me what it was.  That was Dad though…
 
As I look around my own workshop I can see a couple of decades worth of birthday and Christmas gifts from my parents (selected by Dad) that have become part of my own woodworking journey.  It is impossible to enter my shop without seeing dozens of reminders of Dad and his investment in me.  It’s one of the reasons my workshop has always been one of my favorite places to be.

Dad and our family were greatly honored last Thursday, August 30th, when we finally laid him to rest at Arlington National Cemetery.  I was moved more than I have words to describe.  For any reading this who have served or are currently serving in our Armed Forces, know that my Dad had a great respect, appreciation and love for you and your sacrifice.  He believed in our nation and in anyone with the courage to stand in her defense.  I would also like to document for everyone that he attributed all of his success, all of his accomplishments to the love and support of my Mom.  He truly loved her above all and set the example to me and my sisters of what a true husband, father and warrior should be.

God speed Dad.  I love you.

Pete