Pages

Friday, December 24, 2010

Zebrawood Boxes Finished

This last week I was able to spend a little time out in the shop each evening finishing up the boxes.  The heaters and I were working overtime!
After some final hand sanding I gave everything a light wipe down with mineral spirits and let them sit overnight to dry.   The next morning the pieces were ready for a finish.  I decided to go with several, hand wiped, applications of Waterlox Original.

Just the first pass reveals how a clear finish warms the tones of the wood and really sets the grain off.

For the first application I needed a separate cloth for the Padauk lids.  Even after a cleaning with the mineral spirits you can still see the red residue on the finish cloth.  Padauk is notorious for staining…hands, clothes, even other woods if they’re sanded together.  Try getting that reddish hue out of Bird’s Eye Maple!

I ended up doing five layers of finish to really deepen the color and grain.

Here they are…all dressed up for Christmas.

The two Padauk lidded boxes.

And the two Walnut lids.

Here's the whole gang, all stacked up.

I’m pretty pleased with the grain orientation.  The grain pattern flows in-line around three corners on each box.  I’ve got a couple ideas to work with wider stock, or book matched pieces at the start of the project to give myself a little more leeway in matching the grain around all four corners.  For these boxes, that fourth corner will just have to be the one placed toward the wall…much like that dead spot on every Christmas tree.
Merry Christmas everyone.  Enjoy some time in your workshop, but enjoy the time with your family and friends even more.
Pete

Saturday, December 18, 2010

Cutting Corners

My plan to spend some time in the shop last weekend was crushed under tons of snow, much like the home field of our Minnesota Vikings, the Metrodome.  Well…that and the -2 degree high for the day…Brrrrrrr!  I am, however, the proud owner of almost two full feet of snow in our yard and walls/drifts pushing five feet high in some places.  It’d be great to save all this precipitation until it’s time to water the lawn, but we don’t have that many Tupperware containers.
It’s a week later now and almost 20 degrees warmer.  With no snow to shovel, it was time to get back out into the shop.  I fired up the garage heater last night before going to bed to get a head start on warming the space up.
The last few tasks on the Zebrawood boxes involve adding some of the details.  I added a 9 degree bevel to the lids and cut a small 45 degree chamfer around the bottom of the boxes.
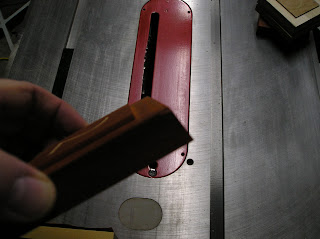
First, I switched out the table saw insert.  I didn’t want to cut into the zero-clearance insert so I installed the original to allow for tilting the blade.

The next step was to set up one of the miter gauges with a stop block and make some test cuts.

The key is to trim the 9 degree bevel right up to the top edge of the lid so that the dimensions don’t change.  If the trimming passes removed any width or length from the top of the lid the shape of the lid would change when trimming each edge.

This little space heater made a big difference while working in the shop.  The bigger ceiling mounted heater takes off most of the chill, but having this small heater to move around to where I’m working made things much more comfortable.

When cutting the lids it was important to make the cross-grain cuts first.  This picture isn’t the best, but you can see a small chip-out at the corner.

Making the long-grain cuts next removes the chipped out corner.

Once the set-up was fine tuned trimming all four lids only took a couple of minutes.

It was then time to set up the router table to trim the chamfer profile around the bottom of each box.  I’m using a 45 degree chamfer bit here with a guide bearing.  The bearing allows for cuts that follow the shape of the box without having to use a fence to guide the work over the bit.

I made a pass with a test piece.  I’m just looking for a small chamfer to create a little shadow line around the bottom of the box.

Once I was happy with some smooth test cuts in some scrap, I cut the profiles on the boxes.

With the lids finished and the chamfer details added, the construction of the boxes is complete.  All that’s left now is some final sanding and to apply a clear finish.

I really enjoyed building these boxes and will definitely make more of this design.  I’ve been kicking around a few variations that I’d like to experiment with.  The set-up of the various steps to complete these boxes were good skill builders and challenged me to consider solutions to ensure accuracy and safety while working.  The next batch of boxes will be a larger run.  Once each process is set up, it’s just as easy to cut the parts for 100 boxes as it was for four.  If only it were as easy to fix the Metrodome!
Pete

Sunday, December 5, 2010

The “Not So” Big Show

I attended my second Woodworking Show on Sunday.  We’d never had them visit us in New Mexico, so the two that I’ve been to have been here in Minnesota.  Last year’s show was held in Minneapolis and was smaller than I was expecting.  I had been reading online over the past few years how the economy has had a big impact on the show.  Every year fewer vendors and fewer woodworking personalities are attending.  The trend must be continuing...this year’s show was held in Shakopee, MN and was smaller than last year’s.  It didn’t keep me from spending a few bucks, but it would have been nice to spend more time at the feet of some woodworking masters.  I was done within a few hours and heading back home before the doors closed.

These shows used to be a great place to see the latest and greatest from the tool vendors.  Now there are just sponsorship banners posted for many of the big tool manufacturers, but no representation or demos.  I was even surprised to see a consolidated tool booth…DeWalt and Delta/Porter Cable sitting right there on the same table.  No Ridgid, Rikon, Triton, Jet or Powermatic, and none of the big tools from anyone.  I would have loved to leave a few drool marks on the new Unisaw or handled some of the Lie-Nielson or Veritas planes.

Here’s a shot of the loot I did escape with.  Not pictured is a 16” Carter Mag Fence, for my band saw, that will be shipped in the next few weeks.

 I was very impressed with the Carter guides and stabilizer at last year’s show, but opted for a Keller-style dovetail jig as my big purchase.  I was glad to see the same crew back again this year and even attended their band saw set-up class.  Along with the fence I purchased the Carter Guide System and the Stabilizer.  I’ll save the details for a future write-up in which I’ll upgrade and fine tune my band saw.  I will say that I’m excited to get this installed and tuned so that I can start tackling some band sawn boxes…another good cold weather project that doesn’t require as much room as furniture pieces.  During the demo, the presenter whipped out a band sawn box, with a drawer, in less than five minutes.  It was pretty slick, even though he moved back and forth between two band saws.  While browsing I did look for any shop heating solutions…sadly none were there.  They sure could have used them though.  I sat in on a talk from Jim Heavy, of Wood Magazine, and it was a little chilly on that side of the venue!

I picked up a few small things (brass striking hammer, center measuring ruler, fine rifling rasps and some profile sanders) and a special show edition of the GRR-ripper by Micro-Jig.  I’ve been cutting more smaller, finer detailed pieces on the table saw and wanted to invest in some increased safety and accuracy.

It looks more complicated than it really is prior to assembly.

Thirty minutes later I had the whole thing put together.  I will probably almost never use it like this, but here it is with all the extra accessories attached that came with the show special package.

That extra green piece is a replacement leg for cutting very thin stock…an eighth of an inch wide, down to a sixteenth if I’m willing to trim it on the table saw.  I’m already kicking around several different project ideas after seeing the demo of this jig at the show.  I’ll put together some action photos and a write-up on the GRR-ripper when I use it on a future project.

All in all, the 35 minute drive was worth the trip.  I already knew that I wanted a set of Carter Guides and the Mag Fence, and that the show special would be better than ordering direct.  I was pretty disappointed though that the show was even smaller than last year’s.  I’ll have to keep an eye on the Show’s website for details of next year's outing.  If it doesn’t look much different from this go around, I’ll probably pass.  Strange to hear myself say that after years of whining about never getting the show down in Albuquerque.  I noticed that a few of the other cities had longer lists of vendors and speakers, so perhaps some “strategic” travel will be in order next year.  Of course, having my lovely bride witness how quickly band sawn boxes can be made when a guy has two band saws could make the local show worth our while.

Pete

Monday, November 29, 2010

Put a lid on it!

This afternoon I worked on fitting the lids for the Zebrawood boxes.  The design calls for a rabbet around the bottom surface of the lid which forms a relief to fit into the opening of the box.   I began my session in the shop by measuring the inside dimensions of each Zebrawood box.  Much to my dismay many of the measurements showed some variation!  OK, so it was only a 128th to a 64th of an inch…but still!
Knowing that the boxes had some slight variations, I cut up a stack of test lids from some birch plywood scrap.  By the time I was fitting the second lid I realized that a test piece for each box was overkill, but the process was a good experience in setting up the operation.

Once I organized all the measurements and test pieces I set up the table saw for the rabbet cuts.  I switched out the thin kerf blade for the wider Oldham blade.  I want the relief on the lid to have some heft so the wider blade will allow for a deeper rabbet around lid.

These lids will be run over the blade and along the rip fence so I used a zero clearance insert to maximize the surface around the blade and reduce tear-out.

These are some touchy cuts so safety is a significant consideration.  They could be cut without any form of push stick since these aren’t through-cuts, however the blade is exposed on the outside of the cut and the distance to my fingers would only be a couple of inches.  I used a length of plywood scrap of the same thickness as my test parts and lid stock to push the pieces through the cuts.

When cutting the rabbets into the lids I left them just a little proud of the inside dimensions of the boxes and then fit each one with a sanding stick.  The idea is to get a snug fit so that the lid doesn’t rattle around, yet can be placed and removed easily.

By the end of today’s stint in the shop I had all four lids fit to their boxes.

The next steps will include cutting an angled profile around the edges of the lids, cutting a small chamfer around the bottom of each box, some final sanding and a clear finish.  We’re almost ready to call these a wrap!

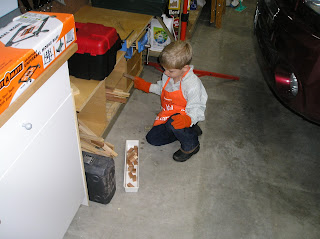
While I was working on the lids Danger Boy was working on some much needed organization of his workshop area.  He cleaned up his wood collection to make some room for his new toolbox.  Things actually take a little longer when he comes along to “help” but you can’t imagine how great it is to hear this little guy come running every time I mention going out into the shop.

Pete

Friday, November 26, 2010

A Little Trip Back in Time

I’m hoping to finish up the lids for the Zebrawood boxes this weekend and thought it might be a good idea to post on the previous work it took to get them to where they are now.  I had chronicled the process on my facebook page some time ago, back when we were living in Albuquerque, NM.  The unfinished boxes had been stored away in a box of several small projects that were in the works when we packed up to move to the Land of Frozen Tundra…or 10,000 Lakes as the locals like to call it. J
The following is a catch-up post to bring you up to date on the project.  These boxes are a Doug Stowe design from his book, “Basic Box Making.”  His design calls for decorative pegs or splines, however this Zebrawood has so much interest in the grain pattern I thought they might make them look too “busy.”   I’ve got plans to do more of these boxes in Oak, where splines or pegs would really add something to the look and feel.
I took a lot of queues from Doug’s book.  For those of you who’ve read it you’ll see several familiar things…starting with the miter sled for the table saw.
Each box side was cut to size with mitered corners on this new sled.

I invested a lot of time fine tuning both the sled and the saw settings which yielded some very nice results.  Square corners are a thing of beauty…if that’s what you’re shooting for.  (Note:  Next time I use this sled I’ll probably have to make some tuning adjustments.  There are some pretty big differences in temperature and humidity between New Mexico and Minnesota.)

After cutting all the side parts for four boxes, it was on to cutting the grooves to receive the box bottoms.  It was critical to mark the pieces with an orientation mark and box number so that the grain pattern flowed around each corner.

Once the grooves were done I cut the box bottoms from quarter inch Baltic Birch plywood.  This stuff is really nice to work with and will provide a very stable bottom for these boxes.   After cutting the pieces to size I cut a rabbet around to bottom of each one, to fit them into the grooves on the side parts.

With all the work complete on the side pieces, it was time for some sanding.  It’s much easier to sand the inside of a box before it’s a box, so I hit each part, front and back with my half-sheet pad sander.  Doug Stowe inverts his on his bench and holds it down with a sand filled inner-tube.  I built a wacky looking jig that can be clamped to the bench top.

Once all the parts were sanded and cleaned up, it was time to assemble the boxes.  I used blue painter’s tape to line up each part and fasten them into a row.   The key is to line them up as straight as possible and to apply the tape with a taut springiness at each corner.  I like using this tape as it holds really well and has a slight stretchy quality.

With all four boxes taped up and ready to go it was time to apply the wood glue.  The small applicator bottle with needle is another Doug Stowe recommendation that I adopted.

It was then time to insert the bottoms and “roll” each piece up.  You’re looking for a hint of tension at each corner as you pull it all together.  This ensures you’ve got a tight fit.

When all four sides have been rolled together some more tape at the closing corner holds the whole box together while the glue dries.

Once the glue had set, it was time to peel all the tape away and clean each box up on the sander.

Then you can pack them in a box, move across the country, pull them out a year later, and then finish them up.  I don’t know why, but Doug failed to include this step in his book.
You can catch up on the steps that followed in a previous post, “How to Clean a Zebra.”  http://secondwindworkshop.blogspot.com/2010/11/how-to-clean-zebra.html
Pete