Pages

Saturday, December 31, 2011

CO Workshop Update #3 - Planning

Lots of planning and organizing in the shop yesterday...translation...moving one massive pile into two smaller piles on either end of the shop!  It took several hours though, so I'll take credit for "organizing."


Until I was able to spend a few hours moving things around there wasn't even enough room to get any of the OSB sheets over to the far end of the shop where they'll be hung.  I've tucked a few of my larger tools (lathe, band saw and jointer) into the laundry room, so now I've got some open space to start making things happen.


I was also able to get the small, side area at the end of the shop cleared out as well.  I'm thinking of adding a few more of the metal racks and using this area to store lumber and to tuck away a mobile dust collector and air compressor.  Ideally, I'd like to squeeze a total of four racks into this area.  I'm having to work around some plumbing, so we'll see how tight it gets back there.


With some wall and floor space cleared out I was able to get some good measurements down to start working on the layout.  For those of you who haven't tried it out yet, Grizzly provides an online tool for workshop planning.  Here's a peak at what I've put together so far.

I've done some preliminary placement of most of the tools, but still have a fair bit of tweaking to do.  The items listed on the left are the parts that still need to be accounted for.  Those with an asterisk are the tools I already have on hand, while the others are part of my future planning.  I'm hoping to leave a lot of wall space free for shelving, pegboard and other storage.  I still need to work out any additional lighting placement and will need to decide where to put Danger Boy's workbench.  We usually end up at the larger work table when working on projects together, but sometimes he just needs his own space.  Those pieces of scrap lumber are not going to cut themselves into even smaller scraps!

Until the next time I move everything from one side of the shop to the other, but don't actually put anything away!

Pete

Thursday, December 1, 2011

New Doug Stowe Box…by Doug Stowe

Hey gang!  Have any of you ever collected any treasures or works by those folks you admire or who have inspired you?   
Yesterday I ordered this box from Doug Stowe’s Etsy site (http://www.etsy.com/shop/DougStowe)

His site was sold out for a while, so I was happy to see some of his boxes available again when I checked in.   I’m pretty excited about owning a small piece of work from one of my favorite “celebrity woodworkers.”  I have several of Doug’s books and his DVD on box making.  He’s been a big influence on my desire to build boxes and try some new things in woodworking.  He’s a great teacher in writing and on DVD and one day I’d like to get out to his neck of the woods for one of his classes.
You might remember some of the boxes I made last year and prior to our move to Colorado this year.  All were Doug Stowe inspirations in either design or technique.

You can check out more of Doug’s work as well as his philosophy on learning and teaching at his website, www.dougstowe.com.  You’ll find a link to his box making blog, his Etsy site and to his blog on his hands on education thoughts and efforts (Wisdom of the Hands.)  Here’s one of his latest designs that gets my creative muscles working.

Doug teaches quite a few children’s classes based on the Sloyd method.  A while back I caught a video of one of his Kindergarten level classes in which he had children doing some whittling to expose them to the nature of how a blade is used to shave and slice wood.  When I ordered the box yesterday I included a note asking for a recommendation on a knife for Danger Boy and he was quick to respond, turning me on to a company that makes Sloyd knives in Mora, Sweden.  I’ve ordered this one with the safety hilt to protect his fingers…and, of course Dad will need one too!

One of the things I’m most looking forward to once the shop is up and running again, is spending time with Danger Boy.  He gets most excited when he feels like his actions are effective and he can see the results of his efforts.  He’s a big fan of the coping saw right now because it’s easy to use and he can control it fairly well.  Soon we’ll add some whittlin’ to his repertoire.
Pete

Sunday, November 20, 2011

CO Workshop Update #2 - Take it EZ.

The day was filled with lots of heavy lifting…I’ll be feeling it later!  I picked up 10 sheets of half inch OSB at Home Depot to start hanging on the walls of the shop.  While it’s nice to have a walk-out basement, it’s a long trek all the way around the house and those things are heavy.  I also bought one of these handy, dandy Stanley Panel Carriers.  It made the sheets easier to carry, but not any lighter!

I hauled all of the panels around to the back patio and put them to the side so that I could set up a work area.

I was also able to bring the planer into the shop from outside.  You might remember that prior to having the double doors installed I wasn’t able to move the table saw or planer in through the sliding glass door.  The table saw will still remain outside until I can organize the shop to free up some floor space, so here it is, wrapped up again, all alone in the Colorado wilderness.

I made good use of the kindling box, just outside the shop doors, and one of my flip-top stands to lay out each sheet of OSB.  I needed to trim all of the sheets down to 88 inches to fit the height of the basement walls, so after measuring and marking each one I set up my EZ-Smart rail and clamps to trim all the pieces to size.

I’ve been using this system for several years now and it never fails.  I added a specialized base to my Ridgid circular saw that allows it to slide along the track, giving you a perfectly straight cut.

The base includes a removable insert that rides along the edge of track creating a zero-clearance cut.  I get no tear-out or chipping when using this system, even with unforgiving OSB.  Can you tell I’m a big fan?

As the daylight faded away, I pulled out the halogen work lights and kept up the cutting.  It was starting to get a little cold, but other than that, it was pretty nice working outside and the lights did a great job.

I hung three full sheets along one of the new walls and then needed to trim another down to 36 inches.  Fortunately I have two of the rails that can be joined together for longer cuts.

I was able to finish this section of the wall before having to pack it in for the evening.  You can see at the far end of the wall that it turns a corner to the left.  There is another nine feet of wall to be covered around that corner.  Back in this alcove are all the plumbing access points for the house and the sprinkler system.  There is also plenty of room to put up lumber racks and eventually position a dust collector and air compressor back there.

Along with covering the wall, I trimmed all the remaining sheets of OSB down to 88 inch lengths and brought them inside.

It would be nice to have the table saw set up to trim and fit these pieces as I work my way around the shop, but unfortunately I just don’t have the floor space available while I still have so many boxes left to unpack and organize.  I may have to temporarily commandeer some of the open, free space in the new laundry room…just while I’m rearranging though…really, I swear!
So, while this wasn’t what I would call actual woodworking, it sure was nice to put the brain, hands and tools together again to get some work done.  It’s been too long!
Pete

Monday, November 14, 2011

CO Workshop Update #1

Ladies and gentlemen, we actually have movement!  Earlier this week our contractor completed installing our new patio door to the workshop and erecting the walls to separate our laundry/mechanical room from the future Second Wind Workshop. 
A shout out is needed here for our guys at Stellar Remodeling here in Denver.  They’re #1 on Angie’s list and did not disappoint in their quote, workmanship and delivering on budget.  Anyone looking for someone to assist with any remodeling projects should give Jack Wilson a call (720-334-0908)
There is still a lot of work to be done on my part, but having these big pieces done for us so quickly is a great leap forward. 
The laundry/mechanical area before…

…and after.

Here’s the new door from the laundry room into the workshop.

A couple before shots of the workshop area…

We had the shop-side of the new wall left unfinished.  I’ll sheath this side with half inch OSB so that I can hang various tools/racks/shelving at any point needed along the wall.

One of the features I was most excited about in the basement was this walk-out sliding door.

Excitement waned when the table saw and planer stand wouldn’t fit through the door!

Fortunately the plastic sheeting and packing tape have protected them, under our deck, through two heavy snowfalls and several rain storms.  Once the scattered mess of half-unpacked tools and wood has been organized a bit, both tools will make their grand entrance into the shop through our new double, patio doors.

The first order of business will be getting that OSB up on the walls, maybe running a few extra electrical outlets along the new wall and installing a light switch just inside the new door.  I'm having flashbacks of doing this in my two previous workshops after relocating…unpacking, stacking and moving piles around several times until everything finally has a place to call home…which means that very little actual woodworking will be done.  After so much practice, hopefully I’ll be much quicker on the set-up this time around!
Pete

Sunday, October 16, 2011

Movin' on Down

It’s been a whirlwind over the last month with time to barely breathe let alone post another blog entry.  While very little has been done to set up the shop space in our new home, we’ve done a lot of painting, cleaning and organizing of the living areas.  The place is really starting to look a bit more “us”…oh, and “us” is officially a family of four now!  Just a few weeks ago we hit the road back to our old stomping grounds of Albuquerque, NM to finalize the adoption of Son #2!  We’re thrilled to have him officially in our family forever, even though he was locked into our hearts the moment we laid eyes on him.
Now that life seems to be cooling down along with this beautiful Colorado fall, I’m looking to get after that shop space so I can start making some sawdust and shavings again.   As you can see, it’s more of a maze than a workshop right now.

Job number one will be to set up some of the metal shelving racks at a temporary location in the back corner so that I can unpack all the boxes and get as much floor space cleared out as possible.  Ideally, I’d like to be able to access the tools I’ll need to work on various projects around the house while I’m getting the shop in order.

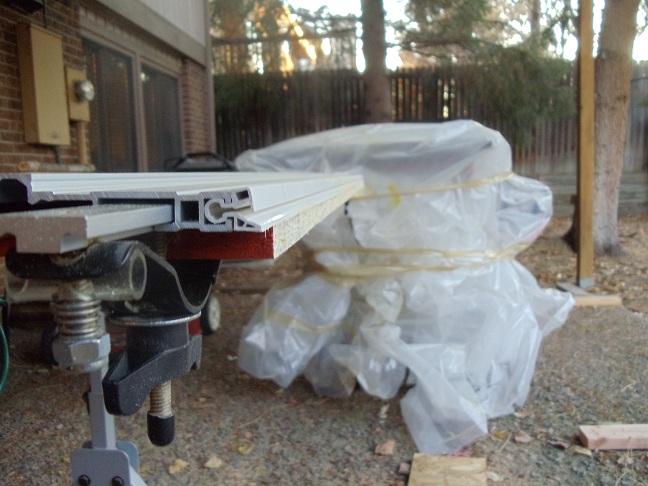
Next up is to solve an issue with the walk-out sliding glass door.  Right now my table saw and planer are out on the back patio covered in plastic sheeting because they won’t fit through either of the doors into the basement.

If I weren’t planning on using the back patio for some of the messier woodworking operations (planer and lathe) I would just disassemble and reassemble both tools and bring them in permanently.   I really like the idea of being able to wheel some of the tools onto the patio and work outside.  I may even build a mobile workbench so that I can spend some time working outdoors every now and then.  To facilitate this al fresco woodworking I’ll need to pull out the slider and replace it with a set of double patio doors.  Winter’s coming so this will be high on the project list for sure.
Another big modification needed in the basement is to wall off the mechanical area and laundry facilities.  Fortunately both are along the same wall at the entry to the basement, so I shouldn’t lose too much floor space, or end up with a funky shaped room.


I’m hoping to get these bigger projects done fairly quickly, so we’ll probably solicit the assistance of a contractor that can frame the walls, replace the patio door and maybe even tackle a couple of small electrical projects for us.
Once I can get a better look at the basement as a whole I’ll start taping off where I want the laundry room walls to go, door placement and I’m even thinking about sectioning off an area to contain a dust collector and air compressor, if floor space allows.
There is a little area under the stairs that will make a great tool corral.  I’ve got the band saw, lathe and planer on Herc-u-lift castor systems, so I’ll use this area to tuck them out of the way until needed.  Now if I can just remember where I put the key to that rolling toolbox!

Just to the left of the tool corral is the access to the crawl space.  There is a small half wall above the foundation, the other side of which is the short riser wall in the family room.

I’ll need to insulate that upper section of wall to deaden any shop noise and then clad it with OSB or plywood so that I can hang some cabinets or shelving up there.

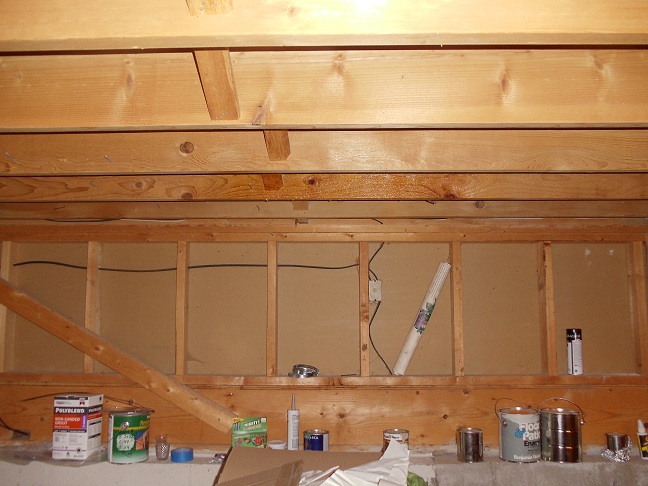
Another aspect of the basement to work around will be these two windows.

I like the natural light coming into the shop and between these windows and the door, quite a bit of sunlight makes its way into the basement, even with the patio being covered by the deck.  The challenge will come in determining how to use the space along the wall and below the windows.   The bottoms of the casings are about 33 inches up from the floor…a little too short for a good bench height for me.

If I build a table or bench below these windows it could serve as a good assembly area, however I wouldn’t be able walk around the entire work surface.  We’ll have to see how the rest of the layout pans out once I get the table saw inside and my regular workbench reassembled.
Lots to do to get the shop up and running again.  I've added several woodworking projects to my "want to do" list over the past few months...looks like they'll linger on the list for a while longer!
Pete