Pages

Monday, February 25, 2013

A Whole Lot of Holes


“The rabbit-hole went straight on like a tunnel for some way, and then dipped suddenly down, so suddenly that Alice had not a moment to think about stopping herself before she found herself falling down…”

It’s a good thing these chair parts are relatively small…15 or 30 mm isn’t really all that far to fall.  Of course we did just have a close encounter with the fourth dimension recently, so you’d better wear your aluminum hats for this one just in case.

This step in the Red and Blue Chair build reveals what is probably my most significant deviation in construction from Rietveld’s original plans.  The recommended size of the dowel stock for the joinery is 15mm wide, and I was originally planning to use some standard 5/8 inch Poplar dowels from Home Depot.  The dowels I brought home did not fit well into the 5/8 inch test holes I had made in a scrap piece of the Beech though.  After mistakenly drilling a 3/4 inch test hole as well, I decided to take the test piece on the road and find the perfect fitting dowels once and for all!
 
After testing well over a hundred 5/8 inch dowels, at a couple different locations, and not finding even one that would fit snuggly into my test hole, I decided to try the 3/4 inch Poplar dowels.  Within five minutes I had two dowels that fit perfectly.  What is it about all of these 5/8 inch dowels?  Were they soaked in the same shrinking potion that Alice drank after falling down the rabbit hole?

The logical part of my brain (not the one conjuring comparisons to Alice’s Adventures in Wonderland obviously) was telling me that these 3/4 inch dowels would provide plenty of strength in the chair’s joinery, so with purchase in hand it was back to the shop…which just so happens to be down in a hole…I mean basement!

Back in the shop it was time to get to drilling.  I used one of the chair parts to set the depth of the holes on the drill press.  I’m shooting for half the width of the stock, so I scribed a line at the center point, lined up the bottom of the Forstner bit, and locked in the depth stop.
 
Since all of the chair parts are the same widths, with the exception of the arm rests, the fence only had to be set up once for all of the holes in the frame pieces.

 
Only the stop block had to be moved to accommodate the location of the various holes along the length of the pieces.

After a couple hours (drilling, moving the stop block, lunch, change a poopy diaper, drill, move the stop block, drill…) all of the parts for both chairs resemble Swiss cheese and are ready for the next step in the joinery process.
 
At a basic level, dowel joinery is just a mortise and floating tenon joint…a round one mind you.  The next steps are to prepare a jig to cut the dowel stock into the small floating tenons and then dry fit the parts together so that I can plan the order of the final glue-up.

Fortunately I’ve recently added a new tool to the shop which will greatly enhance my ability to focus and strategize.
 
Cup of coffee anyone?

Pete

Thursday, February 21, 2013

The Fourth Dimension


At the Woodworking Show a few weeks back, I was introduced to an interesting take on the dial caliper by Andy Chidwick.  He was mentioning that this measuring device was one of his favorite tools because it allowed him to transfer a single measurement, from one place to another, in four different ways.  I knew about three, but what was this fourth dimension that Andy speaks of?  Did he find it at the back of a wardrobe?

The dial caliper has also been one of my go-to measuring instruments for some time now.  Years ago while spending time with Dad in his shop I was admiring his dial caliper and asked him where he picked it up.  As soon as I returned home I logged into the Highland Hardware website and ordered myself the six inch fractional model.  Dad had taken note of my interest and the day after my six inch model arrived, a four inch model of the same design showed up on my doorstep.  Boy, he was always like that.  He said he was sure I’d use the four inch model ten times more than the six…and he was right.  The six inch model is almost too big for the type of work I’m usually doing with a caliper, so it never even comes out of the box.  The four incher hasn’t been back in its box in years.
 
Let’s take a quick look at this incredibly versatile measuring device…

The first measurement is the most obvious.  Just open’er up and give the object a friendly little pinch to determine the outside dimensions.
 
Once you’ve captured the measurement, in this case the width of one of the legs for my Rietveld Red and Blue chairs, you can hold the setting by tightening this lockdown screw.

With our measurement of 30m captured between the lower, outside measuring jaws, we can see that the upper, inside measuring jaws are holding that same width and could be used to transfer our 30mm dimension between two interior surfaces such as the inside of a box or the walls of a mortise.
 
Last weekend I used the calipers to confirm the width of the dowel stock for the joinery on the Red and Blue chairs, and then compared that same width against the test holes I drilled with a Forstner bit on my drill press.

The dial caliper is an excellent tool for measuring the width of round objects as the full extent of the piece’s width can be captured between the jaws, and consequently interior measurements of round or curved surfaces can be easily captured by the upper jaws.  No more guessing or measuring from multiple points above the opening to narrow down the widest distance.

That 30mm measurement is also converted to a depth measurement using the sliding bar at the end of the caliper’s beam.  This is the perfect little gadget for confirming the depth of holes or mortises.
 
So there you have the three standard instances of our same 30mm measurement provided by the tool.  In fact, these are the only three points of measurement that the instructions accompanying this caliper describe.  Hold onto your hats now, as we enter…the fourth dimension!

You won’t, in fact, find it at the back of a wardrobe, rather on the back of the tool.  No really…flip it over right now!
 
That’s right…you’ve probably been holding this gateway to an alternate universe of measurement right there in your hand this whole time.  That distance between the end of the beam with the outer jaws and the end of the beam with the inside jaws is our same 30mm measurement.  Now that flat end of the outer beam can be used to reference the caliper against the surface you want to measure from, and the inner beam forms a shoulder that can be used to “hook” onto the other end of your desired measurement.

This is a great way to measure the length of a tenon by referencing from the end of the tenon to the base of the shoulder.  Then you can use the sliding bar at the end of the caliper’s beam to check the depth of your mortise. 

I know!  Your mind is blown too.  Try to take some deep breaths…flirting with the space-time-measurement continuum can take a lot out of you.  You’ll need your composure for our next adventure.  We’re going to actually traverse between two worlds in a matter of milliseconds…no, wait…come back, you don’t need your passport!  Just lean in and look real close…see that 30mm setting at the top of the scale?  No, really...click on the picture and zoom right in there.
 
Now just relax and let your eyes drift down just a hair…BOOM!  We’ve just converted from Metric to Imperial.  Who knew that 30mm is exactly 1 3/16 inches?!  It’s a lot to take in, I know.  Perhaps we’d better call it a night.  If you have a hard time sleeping in inches though, it’s just a quick hop through the measurement wormhole to get you back to the safety and comfort of the Base 10 Metric system.  I know that fractions can be scary for some.

Sleep tight and don’t let any cosmic insectizoid type creatures that have escaped the fourth dimension bite.
Pete
 

Sunday, February 10, 2013

Ooh Ooh Ooh Mr Carter!


After last weekend’s Woodworking Show I finally got around to installing the Carter guide system (that I bought a couple years ago at the show in Minnesota!) on my Ridgid 14” band saw. 

Before…
 
I went ahead and removed the stock fence and rails as I had picked up a Mag Fence as part of the show special as well.  Although the old fence and rails weren’t terribly unruly, the Mag Fence is much more compact and actually locks down much tighter and straighter.  No more bumping the rails or that old fence and risking the table coming out of square!

Before…
 
I was glad to be rid of the “cool block” style of side guide blocks as well.  Between the friction they produce on the blade and my less-than-desirable set up of the guides I’m sure I wasn’t doing the blade or my cut quality any favors.

Before…
 
The conversion was pretty straight forward…just have a good set of Allen wrenches handy, a little patience and you’re golden.
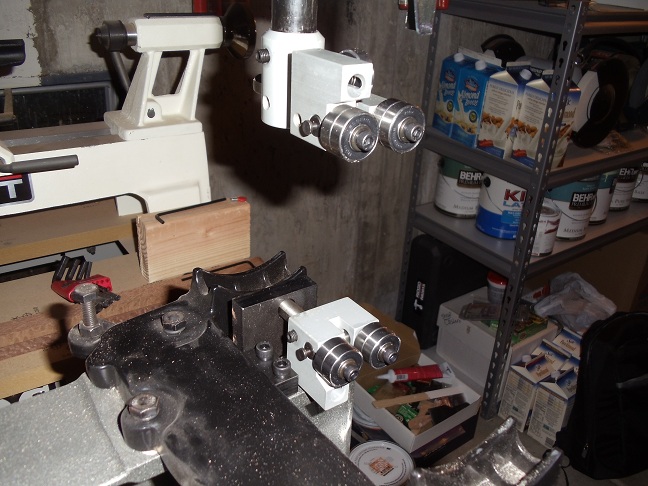
After…
 
Before taking the saw for a spin I also decided to walk through the set-up steps that Alex Snodgrass, of Carter Products, presents in his band saw clinic each year at the Woodworking Show.  I had my notebook handy last weekend and captured the process.  Alex is a regular, vendor attendee of the show, and offers his band saw clinic about a dozen times over the course of the weekend.  He presents these six steps to eliminate drift on any band saw, with or without the Carter guides.

1.       The deepest point of the teeth gullets should be on the center of the wheel.  This places the point where the cutting occurs at the pivot point of the crown of the wheel.  I had been putting the center of the blade at the center of the wheel, maybe even a bit forward of that, which allows the blade to pivot at the back half of the blade.  Can you say drift!?

2.       Tension the blade properly.  You should get no more than 1/8 to 1/4 inch deflection in the blade with a light tap of the finger on the side of the blade.  You should also remove/lessen the tension on the blade between uses to extend the life of your blade.

3.       The side guides should be set to about 1/16 inch behind the deepest point of the teeth gullets.  This will protect the set on your blade’s teeth and reduce heat build-up while running the saw.

4.       The thrust bearing should be set just behind the blade so that when the wheels are turned there is no contact with the bearings (at all) until some slight pressure is applied to the front of the blade.  Those bearings should only contact the back of the blade when you’re actually cutting.

5.       The side guide bearings should then be set as close to the blade as possible without touching.  To keep heat build up to a minimum you do not want your guides in constant contact with your blade.  Heat is the enemy of your steel blades.

6.       Square the table.  There are many ways to check for and ensure square.  Unless you’re looking for an angle or taper…this step is worth doing every time you set up your saw for a cut.

Alex and his Dad will also take time to talk with you about any band saw issues you’re having and will probably pull you over to one of the demo saws to walk you through any concerns or troubleshooting right then and there.  A class act, those two!

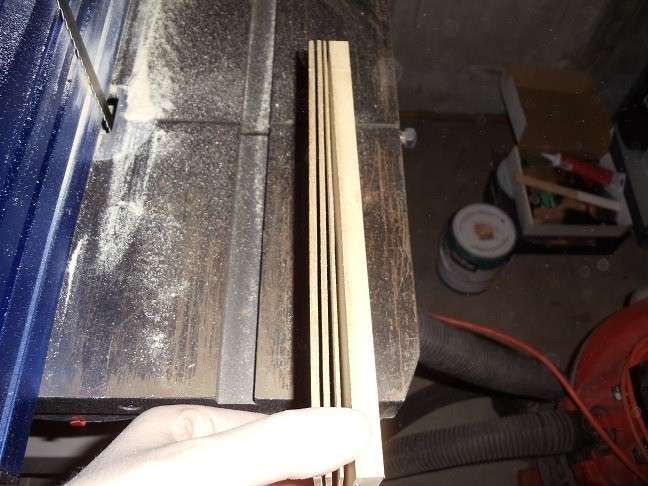
After hitting all six points it was time to fire up the saw!  I set up the Mag Fence for a thin resaw cut…something I knew I would not have been able to do with my previous set-up.
 
I applied a nice and steady feed rate to a scrap piece of Poplar and I was hooked at the first cut!

I didn’t chose a particular measurement, but cut #1 came off at 7/64 of an inch, and was a uniform thickness the whole length of the piece.

I moved the fence in a little closer to the blade and ran it through again.  No rejoining of the face…I just ran it through with the mill marks from the previous cut.  Cut #2 came off at 3/32 of an inch.  Again, very uniform in thickness.

A little closer…cut #3…1/16 of an inch.

Closer…cut #4…3/64 of an inch.

OK…just a little closer…cut #5…1/32 of an inch.

At that point I had reached my limit of comfort without a sacrificial face surface on the fence.

The last couple of pieces showed some variation in thickness…less than 1/100 of an inch, but that may be due more to the rough sawn surfaces being used to register against the fence than the accuracy of the set-up.  A different blade might also yield some tighter results.

Overall, I’m incredibly pleased with this set-up.  I had been resawing free-hand up until now because I could do that more accurately than using the old fence, and even then I had to give myself a margin of error for thickness variations caused by what I now know to be deflection of the blade.

Next up for the band saw is the addition of the Carter Stabilizer…also sitting amongst my tools for the last couple of years.
 
I’m planning on trying band sawn boxes this year, and I’ve seen this stabilizer in action…and it is awesome!

Here’s a demo that Alex does with the Stabilizer, cutting a reindeer out of a 2X4.

I think I’ll just start with some simple band sawn boxes for now.  If I tried that as fast as he does, you’d be calling me “Stubs!”
Pete (Keeping all 10 fingers!)


Friday, February 8, 2013

Lancelot Link - I mean that's a lot of links!


Over the years I’ve really come to appreciate the massive growth in woodworking information available online.  It’s so easy to reference several forums that have over a decade of history and an established membership of knowledgeable woodworkers to tap into.  There are thousands and thousands of hours of videos out there on You Tube or at dedicated woodworking sites.  (View with caution and use your best judgment in determining which of these videos are useful and credible.  Consider the source as well as the reputation and body of work of the presenter when accepting online instruction.)

For any of you newer woodworkers hunting around the web for some good online resources, allow me to share some of my favorites that have offered me good instruction, valuable advice and a lot of inspiration.

My favorite online forums include…


www.woodtalkonline.com  The Wood Talk forum over at The Wood Whisperer’s site (Marc Spagnuolo)

www.lumberjocks.com  A real one stop shop for discussion, videos, blog posts and project portfolios, plus an entire online nation of really great folks.


I also like to check out what some of my fellow woodworkers are doing in other parts of the world.

www.ukworkshop.co.uk  The UK Workshop.  There’s some amazing work being done on the other side of the pond!  These guys are also very design-savvy and have a wicked sense of humor.

www.woodworkforums.com   Woodworking Australia’s online forum.  These guys have been around for a long time, and there is something for everyone.  Browse the different forums to key in on the type of woodworking or projects you’re most interested in.

For excellent video content be sure to check out…

www.thewoodwhisperer.com  Marc does a great job presenting on a wide variety of woodworking topics…and he has been known to wear some of his wife’s clothes from time to time.  He also offers a guild membership with tons of video content, instruction, live chats, interviews and the resources needed to build some pretty amazing projects.

www.finewoodworking.com  They’re not just a magazine anymore!  These guys offer tons of video content, free of charge as well as an expanded set of resources for online subscribers.

www.mattsbasementworkshop.com  Matt Vanderlist is considered the godfather of online woodworking podcast and videos.  Project builds, tool reviews, interviews…all kinds of great stuff can be found down in Matt’s basement in Michigan!

www.woodworkingformeremortals.com  One of my all-time faves!  Steve is a down-to-earth guy out in his garage shop building projects, trying new things and sharing his experiences in his own unique and entertaining style.  Danger Boy and I hit Steve’s site every Saturday morning to check out his latest offering.  We usually end up re-watching one or two of our past favorites as well.

For those of you who enjoy a good podcast, there are several strong offerings out there.  I really enjoy listening to these audio contributions down in my own shop.  They’re great to listen to after the boys have gone to bed and it’s too late to run any of the bigger machinery.

www.woodtalkshow.com  Just when you thought you couldn’t get enough Marc Spagnuolo and Matt Vaderlist…you’ve now got a weekly podcast with the guys every Wednesday.  Shannon Rogers of the Hand Tool School joins the guys to round out the crew, making them a team with incredibly comprehensive knowledge and a wide range of woodworking acumen.  Always a great show.

www.shoptalklive.com  Fine Woodworking’s bi-weekly podcast featuring several of the magazine’s editorial staff, plus a few highly respected guests from time to time.  The guys did an outstanding interview with Mira Nakashima (woodworking great George Nakashima’s daughter) a while back that is just outright fascinating.  Check them out online or on iTunes.

www.modernwoodworkersassociation.com  A great resource and podcast by a group of guys dedicated to expanding the woodworking community and spreading the love of this wonderful craft.  I’ve mentioned these guys in previous posts, and they’re a regular online visit for me.  I will rib them about not being as consistent with their podcasts, only because I want to hear more!  The guys all have day jobs and families, so we’ll try to cut them a little slack…only a little though!

So those are some of my favorite online haunts.  I could go on, but this is a great list to get started with.  From these sites you’ll find links to may other online resources as well as the websites and blogs of hundreds of other woodworkers out there publishing a plethora of fantastic content.  My mind is even racing right now…must…fight…urge to list…another…hundred or so links…in this post!

Now stop monkeying around!  Don't be a C.H.U.M.P. be a chimp...I mean champ!  Get out there and Get Woodworking!

Pete
 

Monday, February 4, 2013

The Breakfast Club

This morning Danger Boy and I filled out his application to participate in the school science fair.  We looked through some sample projects on the school’s website, but everything seemed so canned, or had already been done so many times before.  As we talked about the project it hit us…we should do something from the workshop.  After pondering a bit about what we could do that would involve a good exercise in practicing scientific methods we (OK I suggested) that we test different wood species’ reaction to water.  It’s a great subject that he’ll be able to do some reading on, build a presentation around, and we have at least a dozen different species to choose from down in our shop.

Not only will this be a great exercise to expose my budding seven year old woodworker to the mechanics of wood as a material, and in how to conduct scientific experiments, but I’ll also be able to show him (show him, not let him…yet) how we can size all of our samples to the same dimensions with the jointer, planer and table saw.  He’ll be able to check the lengths, check for square, observe the differences between the various wood types…all kinds of fun stuff!  Now I’m getting excited!  I’d better organize the shop this evening so that we can prepare all of our samples tomorrow after work.

For those of you who don’t have a science fair in which to participate and just can’t wait for the results of our own experiment, you can check out an outstanding resource on the properties of wood by R. Bruce Hoadley.  His book, “Understanding Wood” has been a go-to resource in the woodworking community for over a decade now.  It was one of our text books when I took a few classes at Santa Fe Community College back in New Mexico.  Bruce was also one of the wood properties experts writing for Fine Woodworking in the very early years of the magazine.  He does an excellent job laying out the various properties of wood and how they can impact or influence our use of this material in our work.

(shudder) I just had a nerd moment…remember The Breakfast Club? 

“And what do you do in the physics club?”   “Well, we talk about physics…and properties of physics…”

“Pete, what do you do in the wood club?”   “Well, we talk about wood…and properties of wood…”
 
http://www.amazon.com/Understanding-Wood-Craftsmans-Guide-Technology/dp/1561583588/ref=sr_1_1?ie=UTF8&qid=1360029897&sr=8-1&keywords=understanding+wood

Be sure to check this great resource out at your local library, or pick up a copy for yourself.  I happen to like the technical side of things, so I’ll be hanging on to my copy for a long time…and it should come in quite handy for our, I mean the boy’s, science fair project.

Now shut down your computer and Get Woodworking!

Pete
 

Sunday, February 3, 2013

Get Woodworking Week 2013 - Sunday


Boy, I’m just getting this entry in under the wire for Day 1 (Sunday) of Get Woodworking Week.  For more information on Get Woodworking Week and the genius behind the idea, hop on over to Tom’s Workbench at www.tomsworkbench.com.  This week devoted to getting folks out into the shop, encouraging those new to the craft and engaging the woodworking community, both locally and virtually, was the brain-child of Tom Iovino one year ago.  That officially makes this the Second Annual Get Woodworking Week.  When you’ve done something more than once, you can start calling it “Annual”…much like “Pete’s Fourth Annual Cholesterol Check-up” or the “Umpteenth Annual Disappointing Season for the Dallas Stars”…back off Red Wings fans!

The week also could not have started off on a better note for me woodworking-wise (say that ten times fast!)  We just wrapped up the Woodworking Show here in Denver!  I attended all three days and soaked up as many great presentations as I could.  I have many pages of notes…and a few less dollars.  The boys’ college funds are still intact though.  

This leads into my first recommendation to any beginning woodworkers out there.  Go to the show!  For any of you living in or near the cities hosting the next seven shows of the season, be sure to check the roster of instructors and classes and get yourselves out there.  (http://www.thewoodworkingshows.com/shows.htm)

Sure, there are a lot of product vendors, some with really good demos/instruction, and some that are a little more cheesy and sales-pitchy, but they’ve really stepped it up in the educational experience since my last show up in the Twin Cities a couple years ago.

One of the vendors you should make time for is Alex Snodgrass of Carter Tools.  He runs his band saw clinic and really sheds some light on how to best use this amazingly versatile tool.  He and his dad will answer questions all day long for you.  I had purchased a set of Carter guides at the last Minnesota show I attended, but never got around to installing them on my own saw.  Having been so inspired this weekend…my band saw is now torn apart to make way for these great guides.
 
You should also take some time to check out the Crazy Canadian…no spoilers, just check him out!

The highlights of the show for me were connecting with a few of the local woodworking clubs and sitting in on presentations by Jim Heavey (Wood Magazine) and Andy Chidwick (Chidwick School of Fine Woodworking.)  Jim taught a three-part series on finishing, and I left with a bunch of new ideas and things to try.  He’s also an excellent speaker and story-teller.  You can tell that he genuinely enjoys sharing the craft and teaching others.  Andy (The Woodworking Coach) is just one fired up individual with a real passion for sharing his vision and bringing out the vision and creativity in others.  His sessions covered a wide range of the craft from the technical to the philosophical.  I am very interested in making it up to his school in Montana some time for one of his week-long classes and trying out his new online extension of the school coming in May.  I was inspired!

So there you have it!  Get out to the show!  If you’re not able to make it to one of the shows this year, be on the lookout for other opportunities to get plugged in with others around you.  Chances are there is a woodworking club or guild in your area filled with folks who love to share and teach.  Reach out and start making those connections that will move you along in your journey.

Be sure to hop on over to Tom’s Workbench to check out links to other blogs that are also participating in Get Woodworking Week - 2013.

Before I leave you, take a peek at these few links related to my own show experience. 

Jim Heavey’s blog of his experiences at the shows - http://www.woodmagazine.com/blogs/woodworking-blog/tag/jim-heavey/

Meet Jim – a great interview with the guys over at the Modern Woodworker’s Association (the first few minutes of the interview are lost, but it’s still a great intro to Jim!) - http://www.modernwoodworkersassociation.com/2012/10/mwa-podcast-episode-14-jim-heavey-of.html

Andy Chidwick’s School of Fine Woodworking - http://chidwickschool.com/


For my Colorado peeps…


So now you have a short list of links to get going after.  You have no excuses to not start digging in and getting engaged in your woodworking.  Now go Get Woodworking!
Pete