Pages

Sunday, January 26, 2014

Not the Boxes You're Looking For


At the end of the week, near the end of the game the score is Wenge – 1 and Pete – 0.


This week’s box (three boxes actually) was intended to be a small Wenge box with a Marblewood sliding lid.  The corner joinery was to be a half-lap/shoulder scheme with Maple dowel pegs.  This week has actually been a painful lesson in the highly difficult nature of working with Wenge, especially when it is quarter sawn.  As beautiful as it is to look at it, is a chipping, splintering, almost shattering nightmare…or I just need more practice and patience.  Surely it’s the wood’s fault though.

With all the pieces milled to size, I had set about to start with the joinery.

First I set up a 1/8 inch straight bit in the router table to cut a stopped rabbet into the bottom of each box side to receive an inset lid, another first for me on this project.

These went fairly well, however a few passes on some test pieces gave me quite a scare with some serious chipping at the end of the cuts.

The real struggle came when cutting the shoulders of the corner joints.  A sharp, flat-toothed grind blade with the support of a crosscut sled was not enough.  Severing the wood fibers with a marking knife was not enough.  Even cutting a line with a chisel and then paring some relief to that line was not enough.

Despite several different efforts this testy wood did not cooperate.

Almost all of the pieces experienced tear-out and splintering on the inside faces of the shoulder joints.  Even with several extra pieces handy, there were not enough to make even one clean box.

In a last defiant push, I was able to thumb my nose at Wenge and salvage enough from the carnage to build this all-Wenge lift lid box.  The corners are mitered and pegged with Maple dowels, located in the same orientation as the original intended shoulder joints.  The sliding Marblewood lid is replaced with a Wenge lift lid slab, and even the bottom (which was intended to be a Baltic Birch inset panel, covered in felt) is solid Wenge.  I’m still torn on the title for this one…either “Black Box” or “Take that Wenge!”


It wasn’t a pretty outing this week, but I do believe I’ve settled the score…until we meet again!
Pete

Monday, January 20, 2014

Bottomless Box Construction Notes

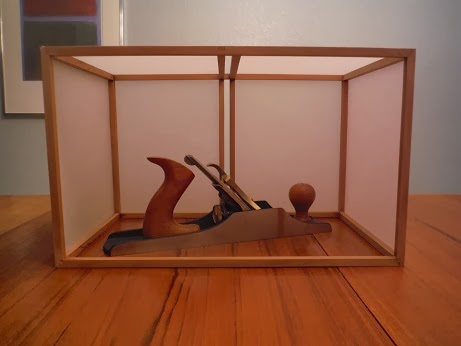
Let’s take a quick walk through the construction of the Bottomless Box.  To emphasize the nature of openness and exposure I opted to forgo the front panel of this box.  Perhaps another exercise could be to completely skin all but bottom and allow the exposure to be experienced in an object’s form behind the paper skin, or in shadow from a light behind or within the box…hmmm, better sketch that one out.

Being inspired by a stick-form design and box kites, I decided to use a small collection of Cherry “sticks” I had milled up for a previous project several years ago.

The chosen joinery is the half lap.  I used my crosscut sled to index all the measurements and cut the joints with a 1/8 inch flat grind rip blade.

I really like this Freud blade!  Nice clean, flat cut surfaces that fit together very well.

I began by assembling the top and bottom structures…10” X 16”

Once the top and bottom frames were glued and cured I set up the sled to cut the next series of half-laps.

Then it was back into the clamps with the 10” long vertical members in place.

I then opted to place a double stretcher across the top and back sides.  The point at which the top and back pieces meet makes for an interesting joint.

That small opening between the two stretchers will serve as a “glimpse” into the box when viewed from the back of the side.  (Perhaps I could add these to the front panel as well, making the box and its contents a little more mysterious but not completely hidden.)  Once all of the parts had been glued together I got to sanding.

I decided to skin the surfaces of the box sides with a semi-transparent, almost frosted paper.  I found this Elmer’s Glue Tape that ended up working out brilliantly for fastening the paper to the stick frame.

Here we have the final product, ready to contain, yet reveal.

I really enjoyed this exercise of stretching the design and purpose of an object.  With another 49 boxes on the docket for 2014 I can see myself taking this journey again…soon!


Pete

In the Box - Out of the Box


A couple weeks ago I was challenged by a twitter exchange with Chris Wong of Flair Woodworks in which he posed the question, “What is the value of a box that doesn’t have a bottom?”  An interesting avenue to explore for sure!

I did some research on whether any value or use has ever been identified in a bottomless box and came up with only a few results.  Most findings were of boxes in which the bottom was missing, removed or destroyed.  I was able to find several engineering applications in which a chamber (box) incorporated an open bottom, usually for the purpose of modifying and/or exchanging fluids or gases…interesting!

In light of my challenge to build a box each week through 2014, I really wanted to follow this opportunity to stretch myself and take on this bottomless box question.  As I think about the boxes I’ve built, of boxes by others who have inspired me, and just the innate, raw purpose of a box…I always come back to the same thought, that boxes are designed to protect or conceal.  We usually go out of our way to box things that are important to us because we don’t want to see them damaged or stolen, or maybe to keep some very personal things private, even secret.

In considering a bottomless box it’s almost like identifying the exact opposite functionality of a box.  Without a bottom a box is incapable of carrying and protecting contents.  You could flip the box over, but then it wouldn’t be a bottomless box, and without a top it wouldn’t do a very good job of concealing.  So other than gas…why would one build a bottomless box? 

How about to fly?

Box Kites were one of the few examples I found of a bottomless box with a purpose, and its structure gave me some inspiration in how to consider my own design.

Follow me along the trail of considering that a bottomless box would serve in a manner directly contradicting the form and purpose of boxes as we understand them.  What if that was the gist of the design?  What if I have something special that I don’t want to protect and hide, but rather expose and share?

Consider this box kite inspired, bottomless box…designed to display its contents through an open front.

What purpose would it serve to create a box that can be dropped over the top of an item already in full view?  Why place an open box form over a picture selected and framed for display?

Perhaps, when you consider the motivation for placing an item inside a box, the purpose of the bottomless box becomes the emphasis on how important the contents are.  By placing the box over this picture of my family, taken when our youngest son was born, I’m communicating that this picture is so important to me that I would want to keep it secure and protected, yet I desire to share it with everyone.

One could find themselves thinking a similar away about other important objects…

A favorite item…


Maybe a box for your boxes…


A present from a foreign land…


Something natural and beautiful…

A powerful memento…


While there are few things I would tweak in making something like this again, it was really fun to break out of the box (sorry, had to do it) a bit and consider objects and purpose in a new way. 

I’ll share the construction details in a follow-up post.  Thanks for following my exploration of the bottomless box, and be sure to follow Chris on twitter (@FlairWoodworks)…who knows where that guy will lead you?!

Pete

Monday, January 13, 2014

Which Box?


This week’s box plan had changed several times over the course of the week.  I was originally going to try my first sliding lid box.  I spent an evening mulling over various wood species, contrasting colors and grains, as well as size and design.

Then it happened…it was just a short Twitter conversation with Chris Wong of Flair Woodworks that set me off on another path.  Chris asked, “What is the value of a box that doesn’t have a bottom?”  Well, that got me thinking!  For those of you who don’t know Chris…he asks a lot of those types of questions.  (His website is also definitely worth a look!)

With this interesting thought rattling around in my noggin, I set out to consider a box with no bottom and what purpose it might serve.  (Queue eerie foreshadowing music here…)  While my intent was to pursue this bottomless box, I had another project awaiting completion that I also put my mind and hands to.

I was making good progress on both projects, with the bottomless experiment being conducted with some left over sticks of Cherry from a previous endeavor.

I’m now about 70% where I want to be with this exploration and have a significant amount of the construction completed…not ready for prime time this week though.  I gave up some Sunday shop time to go help my brother-in-law with some really big boxes…kitchen cabinets!  I even got to build a jig and put the Lie Nielson No 4 ½ bench plane into action.  The Alder cabinets look great in their kitchen.

Undaunted though…I do present a completed box for this week’s challenge.  Here we have another offering from those old salvaged dressers.  The box is Oak with Cherry corner keys and a Karelian Birch veneered panel in the lid.  That Karelian Birch piece is from my first attempts at pressing veneers (Pressing Matters) and veneering onto a substrate (First Veneered Panels.)  Feel free to check out my previous links.   I’ve used those processes several times with great results.  Proof that you don’t need to spend a lot of money to start using veneers on a small scale.

I chose red felt to line the bottom, and the finish is hand rubbed Danish Oil.

This box is designed to hold a break-down candle holder, also constructed from the recycled Oak dressers.  (Break it Down)

There is room for the disassembled candle holder and half dozen tea-light candles.

Stay tuned to find out what happens when the bottom falls out.

Pete

Sunday, January 5, 2014

Box-a-Week Challenge - Number 1


I wrapped up the first box in my 2014 Box-a-Week Challenge yesterday…after a heavy dose of shoveling snow!
 
This offering was built with the Oak I salvaged from some old dressers that belonged to Jill’s parents and grandparents.


The corners are mitered with Walnut keys and the lid includes a Maple burl veneered panel. My original intent was to attach the lid with some 5mm barrel hinges, however I ended up settling on some basic brass hinges I was able to find at Home Depot.
 
I had made a little placement jig for the barrel hinges in an attempt to align them precisely.

There must have been the tiniest amount of slop in the fit, or just enough offset when the jig was reversed.  Once I tested the hinges…

Fortunately I had some Walnut dowels and was able to fill the attempts at the barrel hinges…matching the Walnut corner keys quite nicely.  The box bottom is lined with green felt.  Not only do I like the look of the felt in the bottom, I like the way it changes the sound of the box when it's being closed.

The finish is three coats of hand buffed Danish Oil.  It really warms up the Oak, but also brings it into the same tone as the veneered lid panel.  Next time I use that veneer, I’ll couple it with another wood of a stronger contrast.

We’ll see how long this box survives.  As I write this Denver is covered in snow and we are without a furnace (motor has seen its last days) so the fireplace is blazing and the space heaters are cranking.  It is 6 degrees out right now with an overnight low of -1 expected, but we’re holding up pretty well.  The furnace tech will be back tomorrow to replace the motor and save this box from becoming fuel!

Pete