Pages

Friday, June 29, 2012

New and Old Goodies

After a long day at the office I was pleasantly surprised by a large pile of boxes down in the workshop!  I’m fortunate to have a buddy here in Colorado with a brother who works for Bosch…I know!  How do I get one of those gigs?  Of course half of my paycheck would probably be spent on tools.  College fund, schmollege fund…I need another router!

I was able to score quite a haul for about a third of the sales prices on Amazon.  I may have even out-shopped my lovely, expert bargain hunting bride this time around!  I bet she still won’t let me go grocery shopping by myself though.


The deal was so great that I even picked up some mini-router bits for the new Dremel Trio.  With the rest of the family tucked in and sleeping soundly, I was able to sneak in a little project.  I picked out a small, scrap piece of Walnut and fired up the drill press.


These mini-bits designed for the Trio have a 3/16 inch shank, so they wouldn’t fit very nicely into any of the other router bit blocks and trays I have.   Just a few quick minutes at the drill press and we’re in business!  Just look at how cute these little guys are.

Just yesterday I was also turned onto another great tool acquisition opportunity by the guys over at www.woodworkingtalk.com.  Woodcraft has their Groz hand planes on clearance right now for a real steal.  They’re not top-of-the-line Veritas or Lie-Nielsens, but based on all the feedback I’ve read, they’re pretty serviceable planes.  I went ahead and ordered the three on clearance for Danger Boy.  I’m sure I’ll need to spend some time tuning and sharpening them properly, but these will be great starters for him to learn with.  How many other six year olds have a block plane and #3 and #4 smoothers?


I was glad to see they had the #3 on sale.  The #4 might be a bit big for him yet…of course he is Batman…or is it a Ninja this week?  Either way, he’s going to flip when they arrive and I surprise him.  I just have to keep myself from spilling the beans in the meantime.

While it’s not exactly an upgrade, per say, I did install a 1/2 inch, 4 TPI blade on the band saw a couple nights ago.


I need to get those Padauk boards resawn and surfaced so that I can keep the cabinet project moving.  After installing the new blade I made a few test cuts in some scrap Poplar.


At first I tried using the stock fence and didn’t get as vertical a cut as I would have liked.  I rarely use this fence and it’s been knocked around a few times over the years so it didn’t help at all with eliminating the drift.  I made a second cut freehand, following a scribed line, and got great results.  Looks like I’ll be cutting that Padauk sans fence this weekend…maybe after a couple more warm-up cuts.

I’ll also need to make time to (finally!) upgrade the band saw with the set of Carter guides and stabilizer that I bought at the woodworking show almost two years ago, back in Minnesota.
 
I’ve got plans to use the band saw in a lot more of my work, so it’s time to bite the bullet and lock down some time to install and tune these great add-ons.  Hopefully I’ll be able to replicate the results Alex gets in his demos.  I got a special deal that included a Mag-Fence as well.  Alex was able to use this same fence in his demo to whip out perfect resawn panels like it was child’s play.  I may have just talked myself into upgrading and tuning up the band saw before tearing into those Padauk boards!

Pete

Wednesday, June 20, 2012

First Veneered Panels

Much like a parent fawning over their firstborn child, I’m going to share a truckload of pictures with you in documenting my first attempts at veneering…and like said parent, I’m going to swear that the next photo is even cuter than the one you just saw and you would never forgive yourself for missing it!  Maybe it’s time to start making some home movies.

A couple weeks back I used a glycerin solution to soften/flatten veneer for the first time…lots of firsts in the Second Wind Workshop.


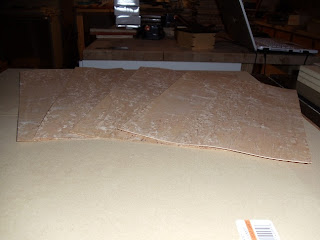
These veneer sheets were pretty brittle (from NM to MN to CO…now there’s some climate change) and had some pretty hard waves.  Nothing too drastic, but being a rookie veneerer I was a little nervous about cracking the sheets when gluing them up, so I went ahead with the glycerin treatment.  Here are a few pics of the veneer coming out of my makeshift press.


I started my veneering adventure with a sheet of the English Sycamore and I used 1/8th inch thick MDF as the substrate.


A fresh utility knife blade did a great job in making a nice, clean cut.


I’m using Titebond’s Cold Press glue and spreading it with a plastic Bondo applicator.  I picked up a three pack for just a couple bucks and they work great for spreading the glue.


Once I laid the veneer onto the glue the edges started to curl up pretty quickly so I didn’t have time for a picture.  I sandwiched the panel in wax paper and a couple of 1/2 inch MDF boards and got the clamps on as quick as I could.


With my first piece of Sycamore under pressure, I turned to the Karelian Birch.


These sheets are a bit larger than the Sycamore, so I tried a larger panel to maximize the veneer.  Same drill…lots of glue.


The edges started to curl up a little on this sheet as well, not nearly as quickly as the Sycamore though.


As you can see, I loaded up the perimeter of the veneer sandwiches with all of my small bar clamps and then ran a caul across the middle, on both sides, to equalize the pressure over the entire surface.


I removed the Sycamore panel from the clamps after about four hours.  After another few hours had passed I learned a valuable lesson…even a thin sheet of wood will begin moving as moisture leaves the surface.  Since I had only veneered one side of the MDF panel it started to bow as the moisture was released.  The Sycamore contracted as the glue dried and it pulled my panel into an arc…not the look I was going for.


You can see how drastic the movement was when compared to this straight piece of plywood.


So now I know why it’s critical to veneer both sides of the panel.  I knew this to be common advice from my fellow woodworkers.  I just didn’t expect this thing to become a potato chip so quickly.

When I removed the Karelian Birch panel from the clamp-up I noticed that the surface still felt a little damp.  I may have used a little too much glue.  Rather than wait for this one to curl up, I placed it between a few stickers and put it under weight to let it dry.


After drying overnight, under pressure, this panel actually came out pretty flat.  I didn’t take any chances though, and went straight to veneering the other side.  I’m happy to report that I was rewarded with a flat piece that will make for some nice box lid panels.


I had also loaded up the Sycamore potato chip with weights and let it sit overnight.
 
The next morning I removed the weight and quickly got the other side veneered.  Another success story!  After veneering the back side the final piece stayed flat after fully curing.


Armed with the lesson of a close call, I veneered a second panel of each type…this time gluing up veneers on both sides at the same time.  It made for quite a scramble to glue up one side and then flip the whole mess over, while the first piece of veneer was trying to curl up.  I was able to get them into the clamps and the attempts turned out to be quite successful.  Here are my panels after some trimming on the table saw.


The second Karelian Birch panel was still drying under weight when I took this last picture, but it looks just as nice as that first one…of course I am a pretty biased, proud parent.

And thus ends my first foray into the world of pressing veneered panels.  Feel free to shoot me any questions on my process or my results, and I’d love to hear some critique from those of you who have gone before and maybe learned a few other lessons that I was spared this time around.

Pete

Thursday, June 14, 2012

Seeing Red

A couple weekends back I brought this board into the shop to compliment a book-matched pair of heartwood/sapwood Padauk panels.
 

The project in the works is a hanging wall cabinet with a bit of a James Krenov feel, that will really showcase those book-matched panels as the doors.

This past weekend I started breaking down this board and running it through the planer so that the wood could begin acclimating to the shop’s climate and making any movement that it needs to before I mill the parts to final dimensions.

After some layout work, I found that I’ll be able get all the parts for the cabinet from this one board and my book-matched panels.


It took some careful planning, and re-planning…but I was able to align the parts in such a way that I could cut the board in half with the jig saw before having to rip on the table saw.
 

Definitely a much safer endeavor to run the smaller boards on the table saw to rip away the pieces I’ll need for the posts that will give the cabinet a floating feel.


Next up was to plane both surfaces to expose fresh wood to the air in the shop.  Since I’m planing both sides of these boards I transferred my markings to the sides so I wouldn’t lose my layout plans.
 

This was my first time using the planer here in the CO basement shop.  I went with the shop vac and my Craftsman tool switch and the results were fantastic!  There was almost no dust or chips from the planing that escaped the vacuum.


I planed these boards down to 7/8 of an inch for now.  The final parts will come down to 1/2 inch and 3/8 inch thicknesses, so I didn’t worry about jointing any of the faces for now.  The camera doesn’t capture the shimmer very well, but these boards look stunning right out of the planer.


The boards are now stacked and stickered up on the workbench.  I’ll start breaking these down further in the next few days.
 
I’m hoping to re-saw the larger boards to salvage some thinner pieces of Padauk to use in future projects.  We’ll see how it goes.   Ideally I’d like to re-saw before breaking the boards down into the smaller parts.  This will allow me to plane the longer boards down to their final thicknesses rather than running shorter pieces through the planer.

I’m excited about this project, so keep checking back to see how it all comes out.

Pete

Monday, June 11, 2012

Up(dated)ended

Earlier this year I was lamenting that the lids on my “Form Over Function” boxes had started to cup a little. 

http://secondwindworkshop.blogspot.com/2012/02/upended.html will take you back to all the gory details.

After tapping into the vast experience, knowledge and generosity of the online woodworking community it looked like the problem indeed boiled down to the temperature and humidity variations between Minnesota and Colorado.  I was following that trail myself, but some further detective work by my online brothers and sisters pointed to the fact that the snug fit of the lids was not allowing moisture to escape from the lids evenly in this drier Colorado climate.   The lids were such a good fit (not bragging here…well, not too much) that the bottom of the lid (which is a separate piece of wood) was completely contained, so as the top of the lid shrunk slightly, the ends running parallel to the edge faces began to curl up.

Some folks advised removing the lids for a while to let the bottoms of the lids acclimate to the new climate.  After several months off the boxes, the return movement was very little, if any.  Another piece of advice was to sand away the finish on the bottom of the lid so that any needed moisture loss would be uninhibited.  I sanded those surfaces a couple of months ago and I’m pleased to say that the lid that showed the least amount of cupping had almost returned to its original state.  It looked like the second lid showed some improvement, but the cupping was still quite noticeable.  Thanks again for everyone’s input!

With a couple extra days off this weekend to play in the shop, I decided to do some tuning of the lids to get them back into shape.  For the first lid, with the least amount of movement, I was able to sand away at the “high” point on the bottom of the lid and get it to lay flat across all the top surfaces of the box walls again.  The fit also remains nice, with no slop or side-to-side wobbling.

The second lid required a bit more extensive surgery…

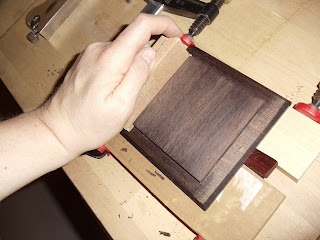
With the lid clamped between two pieces of scrap, to protect the handle piece, I tuned up the scalpel (my Stanley #92 shoulder plane) and sedated the patient.

I took a few passes at a time along the cupped edges, at the “high” points, and tested the lid’s fit with the box. 
 
It required several sessions of trimming and testing to sneak up on a good fit and flat contact with the box sides, but the patient survived the surgery and can now present itself in public again without the embarrassment of flipped up edges.   Some light sanding was all that was needed to clean up the lid bottom and blend away any tooling marks left by the plane.


Here are both boxes all gussied up and NOT smiling anymore, which is what we wanted to accomplish.  J

I’ve also opted to not reapply finish to the bottom of the lids.  Just in case there are signs of movement again, I’d like to be able to just pop the lids off and allow free airflow to work its magic.  Perhaps after they’ve completed their physical therapy treatments we can talk about applying a light coat of Danish Oil one day…but let’s just take it slow for now.

Pete

Thursday, June 7, 2012

Pressing Matters

Well, if you’re thinking that it seems like I’m working on several different projects at once…you’d be right!  I don’t know if anyone else deals with this, but it seems like I’ve always got a few things going at once and depending on the hour of day or the time I have available, one of those projects can earn my attention.  It may be a bit of a scattered way to work, but running the planer at 11:00pm is frowned upon in this neck of the woods.  Pressing veneers, on the other hand, is a very 11:00pm friendly activity. 

This is my first time utilizing veneers, or pressing them with a softener, so I’m pretty excited to jump into this new technique.  Here we have my first glycerin, veneer softener mixture.  That little bottle seems pretty expensive sitting on the shelf at Rockler until you realize that it’s enough to make two quarts of the mixture.


Tonight’s shop- time is especially adventurous as we’re experiencing a massive down-pour here in Lone Tree, CO and I’ve discovered that the ceiling in our garage (under the little balcony deck of the master bedroom) is leaking in about three or four places.  There’s not much I can do about it now, other than check on the strategically placed buckets every now and then.  The joys of owning an older home!

Back to the veneers!  First up are these few sheets of curly English Sycamore.  Even before wetting them down with the mixture you can see that the figure in these pieces is just stunning.
 

All that curl is really going to pop and reflect the light in some pretty cool ways once it’s received a clear finish and maybe even some wax.  You can get a bit of an idea of what it will look like with the finish when it’s received a healthy dousing of the softener mixture.  (I don’t think the camera is doing it much justice though.)


I haven’t gone so far as to build an actual press, but I did pick up some nice, flat sheets of half inch MDF to use to press each sheet of veneer.  I’m placing each piece between some salvaged packing paper and sandwiching them between the MDF sheets.


I also cut down a couple sheets of the Karellian Birch veneer since they’re a little too long for my MDF pressing pieces.  I gave them the same treatment as the Sycamore…


All of the sheets were stacked together and then loaded up with a pile of weights.  I decided to press them on the table saw top to ensure a nice flat surface all the way through the stack.


I’ll leave these under pressure for a couple days to ensure they come out nice and flat.   Based on most of the feedback I’ve received from the amazing online woodworker community, I’m probably executing a bit of overkill since these veneer sheets were fairly flat already.  There is some ripple/waving in these pieces, and the Sycamore is actually pretty brittle.  I’ll feel a little better knowing these sheets are good and flat and that there is a bit more flexibility in the wood when I go to glue them to the substrate.

Oh boy!  Here comes another round of rain!   I’d better go check my buckets.
Pete