Pages

Wednesday, November 28, 2012

Rietveld Build Beginning

I’ve started working on a project that I’ve wanted to build for some time now.  Gerrit Rietveld’s iconic Red Blue Chair (Roodblauwe Stoel) has been a favorite design of mine for years.

A couple weeks ago I took a trip out to the lumber yard to pick out stock for two of these chairs, plus another Rietveld design, his Steltman Chair.

I picked up 26 board feet of 8/4 Steamed European Beech, enough to build the frames for two of the Red Blue Chairs.
 
I’m planning to build and paint one chair following the original design plans and build a second chair that will receive either a clear finish or a gray-scale paint scheme.

I also purchased 16 board feet of 8/4 White Oak to build the Steltman Chair.
 
There are right and left oriented versions of the Steltman design and I’d eventually like to build both, however, I only have enough lumber for one right now.  My plan is to build the chair with the left armrest first and then build the right sided version later.

That same weekend that I brought the lumber home I rough cut the slabs into smaller, more manageable pieces with my circular saw out in the garage.
 
After breaking the slabs down I stacked and stickered them down in the shop to allow them time to acclimate.  Over the Thanksgiving weekend I ripped the smaller slabs down to sizes that will be workable on my 6” jointer, but would still accommodate all the part sizes needed for the design.

I hadn’t cut much heavy slab stock on my old Ridgid TS2424 previously.  With my Freud rip blade and a nice and steady feed rate though, it handled both the Beech and the Oak just fine.
 
With all of the stock ripped and re-stacked I’ll be ready to start jointing and planing this next weekend.
 
I’ll probably re-stack after those operations and let the wood acclimate again for another week before milling the parts to their final dimensions.   Good thing I have a few smaller projects in the works to keep me busy while I’m waiting!

Pete

Sunday, November 25, 2012

Shop Art

With a premise of using as much salvaged material as possible I started this art piece almost two months ago.  I worked on it a little at a time…sometimes from a timing perspective and sometimes from a process perspective.

The salvaged materials are all from previous projects around the shop…pegboard, 2X4 scraps, plywood and even some acrylic paints.  The only purchased materials were the cans of spray paint.  Even the plastic drop cloth used to protect the bench was reused.  Of course there were some of the standard consumables that were already in the shop…tape, glue, wall anchors and screws…I did reuse a handful of old sandpaper scraps though.

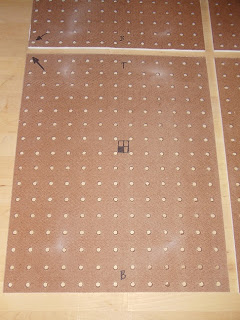
The base parts of the piece are the pegboard and thin strips of 2X4 stock.  I jointed and planed the faces and edges of a couple 2X4 scraps and then ripped them down to these strips on the table saw.
 
After cutting the pegboard panels to size and priming the faces, I laid out the positioning of each of the four pieces and marked the backs for future reference.
 
Since the painted pattern and the position of the strips will rely on the placement of each piece to maintain continuity I didn’t want to take any chances on me remembering which piece went where…or which way was right-side up…or upside-down…or, well you get the picture, and some of you have been down this same road!

I had toyed with the idea of leaving the wood strips their natural color, and I may do another piece with that tact, however I opted to use some colored stain to present more energy and contrast.  A quick trip to Home Depot revealed that small cans of colored stain could be had for $12 each…what!?  A quick trip back home and a few minutes on Google revealed that I could make my own with watered down acrylic paints.  So in the interest of using materials on hand…OK, you got me, I’m cheap!  The process was actually pretty easy, and the wood took the stain quite well.
 
When the piece is hanging on the wall I wanted a one and a half inch gap between the panels on all sides.  I laid out my four parts, on a plastic drop cloth, with two scraps of 3/4 inch plywood between each panel to aid in placing the pieces.

Once I was happy with the placement I taped the parts down to hold their position on the bench top.

With all of the parts secured, it was time to start getting “artsy.”

One of the processes that made this project take extra time was the painting.  Because I wanted triangular forms with crisp edges only a couple of areas could be painted at any one time.

With each section I would remove the tape edges and paper about 10-15 minutes after spraying and then leave the piece to set up for a day or two.  Because I would have to tape out subsequent sections over areas that had already been painted I wanted to be sure the spray paint was cured and hardened.

Once all of the sections had been painted it was time to add the layer of the wood strips.  I wanted the strips to traverse across two, or even three, panels in some places, and I wanted to highlight as many of the knots as I could to emphasize that this was another material layer.
 
You can now see the critical role that taping the panels into place plays in the design.  Once I was satisfied with the location of each strip I marked their locations with some blue painters tape.  I oriented the tape to indicate the direction of each piece and marked it with each piece’s color and whether it was laid under or over any adjoining strips.
 
My lovely bride snapped a photo of me explaining the layout.  I have to confess I was so “into my own thing” that I didn’t even notice this was taken until she showed me.  J

Just before moving on to attaching the strips to the panels I had the thought that this spray paint is pretty slick (Duh!) and that the glue I was planning on using probably wouldn’t fare too well.  I decided to conduct a little test first…gory details here - http://secondwindworkshop.blogspot.com/2012/10/testing-titebond-321.html

At the end the day there was no way around it…some sanding would be required!  Using the tape layout pieces as a guide I sanded away the top of the paint layer to create a better gluing surface.
 
The placement of the strips was another time consuming process as only one or two could be done at a time.  The weapons of choice…some plywood scraps and a whole lot of weight.

With all of the strips in place I could now remove the panels from the bench top and trim all of the overhanging pieces.  My little Japanese Dozuki was just the ticket.

The drop cloth actually looked a little “artsy” in its own right.

It did go on to serve another purpose though, as a layout guide for where to place the wall anchors.

I decided to hang these panels using French cleats.  I attached the cleats at the top side of each panel and added a little offset strip at the bottom.

Because the positioning of each panel, in relation to the others, is so critical I used wider cleats to allow for some side to side play, and cut these vertical slots into each one to accommodate any adjustments up or down that might be needed.

All in all, I’m pleased with the piece.  I think having it take so long (more from having a day job than anything else) had me “getting used to it” if that makes any sense.  There were many lessons learned along the way and I could point out all kinds of things I would do differently or challenges I ran into that required some kind of fix, however, in the words of woodworking great, Jim Heavey, I’m just going to “shut up.”

Pete

Thursday, October 25, 2012

Testing Titebond 3...2...1


OK, so I only tested Titebond I and III, but you can’t do a countdown and skip II.
 
I’m working on an art piece made of extra shop scrap left over from other projects.  The base of the piece…the canvas you might say, is 3/16 inch pegboard that has been spray painted.  A second component of thin wood strips will be included as well.  Those will need to be attached directly to the painted surface. 
 
As I was laying my pieces out, playing with the configuration, I began to change my mind on the original design.  I had thought about using some kind of fasteners to give it a more “workshop” or industrial type quality, but then decided that no longer appealed to me. That’s when the thought hit me…”How am I going to secure these pieces to this slick, painted surface?”  It then dawned on me that I had already invested a fair amount of time in designing, laying out and painting this piece that I’d better run some tests before diving headlong into what could be a disappointing experience.
 
That’s when the Second Wind Workshop became the official Lone Tree Adhesive Proving Laboratory.  Basically I laid down a plastic garbage bag and spray painted a test piece.

The goal was to test the glues that I have on hand, in this case, Titebond I and III, and some Super Glue Gel.  I tested these adhesives on the untouched, painted surface as well as on the painted and sanded surface.

I didn’t bother with the Super Glue Gel on the sanded surface.  I was assuming that the surface was less critical with this adhesive.
 
After a day of curing under weight, it was time to apply some stress to the pieces.  It didn’t take much pulling force to just pop the Titebond I test piece right off of the non-sanded surface.

Same with the Titebond III.

Both of these pieces came off very easily.  There is no way these scenarios would hold up to any kind of rigor.  I had higher hopes for the Super Glue Gel, but that piece also released fairly easily…and took some of the painted surface with it!

The sanded surfaces however…a whole different story!  I picked them up and shook them.  Neither the Titebond I nor III released from the test piece.

I was pleased to see some good results that will allow me to continue on with my work on the original piece.  I’m disappointed however, to not have solved one of woodworking’s greatest challenges…how to avoid any extra sanding!  J

Stay tuned for a write up on the actual art piece soon…after some sanding…

Pete

Saturday, September 29, 2012

Interview with a Master

September 20, 2012 was a sad day for members of the online woodworking community when we lost a fellow woodworker whose passion for the craft was intense and contagious.  Neil Lamens (http://furnitology.blogspot.com/) was about as fired up as anyone could get about woodworking, design and pushing the craft forward.   I only knew him through our online interactions, but his zeal came through in every post, video and e-mail.  Neil was incredibly generous with his encouragement, critique and wisdom.  He answered every question I ever threw at him and he LOVED engaging with folks who were new to the craft or were stepping outside of their comfort zones for the first time.  Talk about having an inspiring cheerleader on your side!  He was a class act through and through.

You can still hop over to Neil’s blog site and check out his videos and articles.  He did a great series of videos on a Carlo Mollino inspired table that is still one of my favorite online videos.  I think I’ve gone back and watched it three times over the years.  Today I wanted to share a video Neil did with famed furniture designer and sculptor, Wendell Castle.  It’s always interesting to hear directly from people who are considered masters of their craft, yet part of what makes this interview so fun is the experience that you can see Neil having.  He’s so appreciative to be sitting across from one of his heroes and you can just see it in his face.  Enjoy this two part interview with an icon of design…


Be sure to poke around the rest of Neil’s posts too.  He put a lot of great content up on woodworking and design over the years.

Amazon is going to get some business from me today.  Neil recommended a couple books to me and I’ve had them on the wish list for a while now.  Time to pull the trigger and dig into some design history and philosophy.

RIP Neil.  We’ll all miss you.

Pete

Sunday, September 23, 2012

Keep the Ball Rolling


It’s been a bit of a crazy week here in the Second Wind Workshop…busy at work and a houseful of sniffling, sneezing, coughing, aching…you get the picture.  I’ve been able to squeeze in some shop time though to keep the project list moving along.  I also received some great feedback from my fellow woodworkers in the online community on keeping things fresh, staying inspired and managing project time.  There really are a lot of amazing, talented (and generous!) folks putting themselves out there and sharing their skills and experiences without any reservations.  THANKS!

My go-to finish is usually some kind of wiping varnish or a Danish Oil finish.  I like the control one gets with a hand applied and rubbed finish, however it does require a bit more of an investment in time.  A few days ago I decided to give a sprayed lacquer finish a try for the first time.  I opted to try a canned finish as I’ve seen quite a few folks online have some really nice success on their projects. 

I chose Deft Clear Wood Finish (Satin) to try on two of the Oak and Sapelle candle holders.  I set up a make-shift spray area on the kindling box on the back patio and went at it.
 
After the first few light coats I was really pleased with how they were turning out.  These will require only a light sanding with some 320 or 400 grit sandpaper to clean them up before applying the final coat.

I’ll experiment with spray finishes a bit more on a few more small projects, and then I’ll have to take a serious look at a spray gun to use with my air compressor.

While the lacquer was curing on these two candle holders I turned my attention to the break-down version.  I’ll build a small box, also from the repurposed Oak, to contain both the holder and a small supply of the tea light candles.  The long base piece is the guiding part that will decide the minimum dimensions of the box.  With the pieces stacked like this I’ll be shooting for an inside dimension of ten inches long, two inches wide and two inches tall.
 
These dimensions will leave enough room for six of the candles to accompany the holder.  The box will be made from some of the stock that was milled to 3/8 inch thick.

Over the past several weeks I’ve been pressing veneered panels in several different species.  I've amassed quite a little collection of pieces ready for use in box lids or maybe even some paneled doors.

I had hoped to use panels pressed with this stunning Walnut burl.  I thought the color contrast would pair well with the subdued tone of the Oak, and the wild grain pattern would be framed nicely by the straight grain in the body of the box.

Unfortunately, when I pressed these sheets onto the 1/8 inch MDF substrate some of the cold press glue squeezed through the open grain and glazed onto the show surface of the veneer.

There was quite a bit of glue that came through…more than enough to eliminate any continuous piece long enough to serve as the lid panel for the candle holder’s storage box.   I’ve done some sanding (wet and dry) to see how much I can salvage, but I’m worried about the thickness that will be left as I continue to work these panels.  I may be able to salvage some smaller portions for use in smaller boxes though.  I’m wondering if there is a way to seal or size the surface to be glued down to the substrate in advance.  (A little research project to be undertaken…I’ll keep you posted.)

I’ve decided to use the panel that presents the strongest color contrast with the Oak, the Sapelle.
 
It won’t provide the same drama that the Walnut would have, but the beeswing figure should still look very nice once it’s been oiled, waxed and buffed.

Just rolling with the punches and rolling through the list.
Pete

Tuesday, September 18, 2012

Break it Down


Project momentum continues to build here in the Second Wind Workshop.  The squirrels have been kept at bay!  J

We have a confirmed sighting of a finished project.  It’s a small one, but a done one!  I present to you the Break Down Candle Holder.

Again, I’d like to give a shout out to Steve Ramsey over at www.woodworkingformeremortals.com for the initial design.  Click on over to his sight for some great project ideas and a little wackiness.  Thanks Steve!

Here we have all the parts stacked up neatly.
 
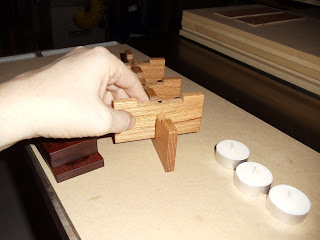
The three cross members are dropped down onto the bridle joints of the longer base piece.  All of the base pieces are made with salvaged Oak from a set of old dressers.

The fit is a little looser than I’d like but it still comes together well.  I lost a shade more of the thickness than I wanted to when sanding the parts.  I’ve locked that tid-bit of learning away for future builds.

The little platforms to hold the tea light candles are Sapelle and click right into place when the rare-earth magnet engages the head of the tack in the small cross members.

While you can’t turn the whole assembly completely upside down it does hold together quite well due to the magnets and the natural friction between the pieces.
 

Here it is all lit up.

Workshop mood lighting anyone?

I really like how the Danish Oil brought out the warmth in the Oak and the deep, rusty red of the Sapelle.  I hand rubbed four coats of the oil finish with some light sanding and then buffed the final coat with a rag.

One project down!  Next up...the fixed versions of this same candle holder.
Pete