Pages

Thursday, November 21, 2013

Getting Ready for the Woodworking Show


This weekend the Woodworking Show comes to Denver and I’m looking forward to a little extra time off from work and down in the shop.  It’s been a busy few months and the show comes at just the right time to recharge my woodworking mojo.  The snow is falling and I’m home today as we have a new garage door being installed as I write.  The show doors open tomorrow at noon…only 21 more hours to wait!

I’ve been browsing this year’s seminar list and am excited to see that show stalwart Jim Heavey (Wood Magazine) will be in full swing with three different talks on cabinet construction, doors and drawers.  He’s, by far, one of the best reasons to attend the show.   Back again this year is Andy Chidwick (The Woodworking Coach.)  I really enjoyed his talks at the last show on design, creativity and sculptural work.  It’s good to see him on the docket again.  Andy lends a spark of creativity and credibility to the show that was beginning to fade out a few years back.  The schedule is rounded out nicely with the likes of Roland Johnson (Fine Woodworking), Bradley McCalister and Bob Settich (what woodworking magazine has this guy not written for?!)  I should have no problem filling a few days with seminars and a lot of pages with notes.

As I review the list of classes/seminars, I spy several new faces that I’m looking forward to seeing as well.  This year Marc Adams (Marc Adams School of Woodworking) has signed on and is making his way around the country with the show.  His talks are a full three hours (four different topics) and are paid seminars for an additional cost.  I haven’t decided yet, but I am considering attending one of his sessions…”Methods of Woodworking” or “Joinery.”  The cost is $50 per session, but hey…it’s Marc Adams.

I’m also looking forward to visiting the turning area of the show.  This past Father’s Day I received some new turning tools that I have yet to try out.  I’ll be spending some time with the folks from Easy Wood Tools for some hands-on practice at the lathe.  Needless to say…the tool vendors will be on hand with all their temptations.  Pray for me…my wallet…the boy’s college funds…

Three years ago I blogged about being a little disappointed with the show when I was finally able to attend them up in Minnesota (The Not So Big Show) however, there has been quite a spark of redemption starting with the last Denver show back in February.  New ownership has really started to revive excitement around the show and make it an event worth attending.  For any of you fellow Coloradans planning to attend the show, hit me up in the comments here to let me know when you’ll be there.  I’m planning on attending all three days.

The guys are almost done with our new garage door…let the long woodworking weekend begin!
Pete
 

Sunday, September 8, 2013

Nihon no surudoi nomi!

I really hope Google Translate can be trusted and that I haven’t just declared that I use goose fat for deodorant or that I drive a hairdryer to work...only one of which is true.

A couple weeks ago I took my first crack at using barrel hinges on an Oak box project.  My measurements were just a hair off so the lid didn’t line up perfectly with the box when closed.
 
After kicking the cast iron base of the drill press...much harder than my foot by the way...I set my mind to salvaging the box.  After all, there is a pretty spiffy looking Maple burl, veneered panel in the lid.
 
Because the offset is so slight one’s eye cannot really tell that the positions of the holes aren’t symmetrical, so I opted to plug the holes with Walnut dowels to match the corner key splines.  I can just hear Jim Heavey now, telling me to “Shut up!”

After gluing and trimming the dowels I needed to pare them down flush with the surface of the box wall.  The box material is only 3/8 of an inch thick so I didn’t want to risk any rocking with a block or chisel plane.  Instead, I reached for my nihon no surudoi nomi.  To you, that means I pared down those dowels with razor sharp Japanese chisels...or a hair dryer.

It’s been a while since I used my Japanese chisels as my Marples and Stanleys are the go-to chisels out on the bench.  I chose the Japanese chisels because of the position of the blade in relation to the handle.  I wanted the length of the chisel iron to ride flat along the wall of the box and allow for some control to skew and draw the edge across the end of the dowel.  They cut like a dream!  Even end-grain Walnut was no match for these keen wonders.  Then it hit me...I had snapped a few photos a while back when I was sharpening and setting the hoops on the handles and still hadn’t shared them here on the blog.  So grab some popcorn, sit back, relax and enjoy the show.  Well, maybe don’t sit back too far.  You still have to read and work that scrolly, wheely, thingy to see the pictures.

Setting the hoops onto the handles has to be one of the most frustrating tool prep exercises I’d ever done.  I read the booklet that came with the chisels and did some follow-up research online.  The process of hammering the sides of the handles to compress the wood so that the hoops could slide onto the end...not very effective for me.  Maybe I was a little too impatient, but I was really wailing on one of those handles and it didn’t seem to have much effect at all.  I ended up using a carving knife to sneak up on just the right width for each handle, followed by some very light sanding.
 
Once all the hoops were set, with just little bit of the handle protruding past the hoop, I was able to use the hammer to preen the ends.

With the ends set, it was on to flattening the backs.  One of the unique features of Japanese chisels is the hollowed back.  There is much less material to remove when flattening the backs, so the process is pretty quick compared to western chisels.  I used the sandpaper on glass method...Scary Sharp!

Until last year I used to do all of my sharpening with sandpaper on glass or water stones...that is until the Work Sharp 3000!  Sounds like something from the late night infomercials in Robocop, but it works great.  I didn’t get it for a dollar though.

Another difference with Japanese chisels is in the make-up of the chisel iron.  There are actually two layers of steel, one hard (at the cutting edge) and one softer (along the top of the iron.)  I had to be extra careful using the Work Sharp to avoid heating the softer layer too quickly.  It took a little longer than when sharpening my western style chisels, but the edges came out razor sharp...or covered in goose fat, depending on translation.

Included in my set is a very thin, 3mm (less than 1/8 of an inch) chisel.  This one did not fare so well on the Work Sharp.  The temper is fine, so no damage done to the steel itself, but the end is no longer square.  You can also just make out a bit of a facet in the surface of the edge.  I’ll have to rig up a jig to hold the narrow iron and fix this one on the sandpaper or water stones.

As I said...they cut like a dream!  Those Walnut dowels never had a chance, and no unsightly gouges or scratches left in the surface of the Oak.

They also served me well a couple months ago when trimming some Wenge inlay banding on another box project.  This was face-grain, but Wenge can be very splintery and unforgiving.  Just look at those smooth shaving curls.

I had trimmed the inlays down quite a bit with block and chisel planes and then fine tuned the final cuts with the hair dryer...uh, Japanese chisels!

I was fortunate enough to acquire this set several years ago at a special discount price.  At the time I thought it was a bit frivolous.  In the end though, I’ve come to appreciate the unique qualities of these chisels and on many occasions they have been just the right tool for the job...and they make my armpits smell terrific!
Pete
 

Sunday, August 18, 2013

You can never have too many, well you know.


One thing is for sure…the longer you’re a woodworker, the more and more clamps you’ll accumulate.  They come as gifts, they tempt you on the shelves in stores, you see Norm using them on TV…and then somebody online shares a link to a sale or a once-in-a-lifetime coupon for so much off that it would be financially irresponsible for you to not buy them!

I had amassed quite a little collection, and believe it or not, I actually found myself coming up short on a few glue-ups over the years…especially once I started pressing some veneered panels.

It’s not that we don’t have a lot of clamps.  It’s that we usually don’t have a lot of any particular clamp when we really “need” them.  Due to a massive sale many years ago I was able to acquire quite a pile of Bessey K-Body Parallel clamps…and I do mean massive…think 75% off the normal price.  Like I said, I didn’t want to be financially irresponsible...so I may have bought a dozen...or so.

Fast forward a few more years…a few birthdays and Christmases later…then layer on another stack of clamps that I brought home from Dad’s old shop a couple months ago, and you just might be thinking, “If anyone has enough clamps now, it’s that knucklehead Pete!” 

I won’t even try to argue with you…well, not until that next project comes along that finds me scrambling for just the right clamps to execute a “precision” glue-up!

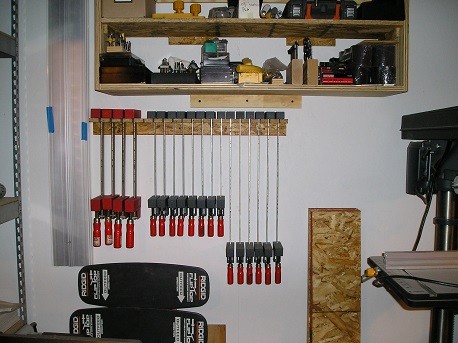
Yesterday I finally got tired of moving stacks of clamps around the shop from place to place when I needed to work, or kicking over those that were leaning up against the bench or cabinets.  Free wall space is starting to become a rare commodity in the shop, but I was able to tuck another rack in for some of the shorter K-Bodies and UniKlamps.

This freed up a little space on the existing wall rack to be a bit more organized with the various sizes of clamps that seem to be multiplying in my shop.

Previously, I had been keeping the long K-Bodies (40 and 50 inch) on rolling clamp racks.  These were great in the big, garage shop back up in Minnesota, but down here in the basement shop floor space is becoming almost as precious as that rare, open wall space.  Again, I found myself frustrated with having to move these rolling racks around the shop to work…sometimes even to get from one side of the shop to the other.  No, that still doesn’t mean I have enough clamps!

At my wit’s end, I looked to the heavens and cried out in desperation…OK, maybe I was crying because I nailed my shin on that dang clamp cart again!  There it was, the answer to my prayer…

A few quick stretchers placed across the ceiling joists, and voila!  Not only are those big, heavy clamps out of the way, but they’re perched quite handily right above the work table where they’re most likely to be used.

That means that these shin-busting, toe-cracking, knee-biting...uh...I mean wonderfully, useful rolling clamp racks will be finding their way onto Craig's List, to bless the shop of another sucker...er, woodworker!

Side note:  I wrapped up all this clamp organization and starting writing this entry last night.  As I finish it up today I see that our good buddy, Tom Iovino, over at www.tomsworkbench.com has just posted his weekly poll entry on…you guessed it…clamps!   Head on over and share your clamp situation in the poll.


Have a look at the options.  I bet you can guess how I voted!

Pete
 

Monday, July 22, 2013

Danger Boy's New Bench


Since setting up shop almost four years ago at our home in Minnesota I’ve made a space for our #1 son, Danger Boy.   Let me tell you, there is nothing like watching your kiddo’s eyes light up when you “get it right” with them.  Between the bench I cobbled together from an old Gorilla Rack and a generous donation of tools from Grandpa, he just went nuts!

After just a couple short years up in the Great White North, we packed up and moved to our current home here in Colorado two years ago.  The Gorilla workbench came along with us and fit nicely under one of the windows in our basement workshop.

One of the drawbacks of his bench is that it was designed for a much shorter four year old. Now that he’s pushing eight, you can see that working with a benchtop at about 20-21 inches high is getting to be a bit of a problem.
 
Almost a year ago, my Dad, my boys’ Grandpa passed away…way too soon. 


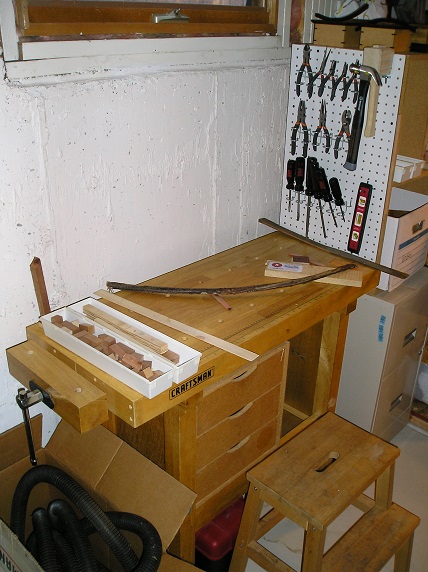
About a year or so prior he had shut down his own woodshop as his breathing became more and more difficult.  (Please, if you’re a smoker…stop!  If you need help…get it!  My Dad’s last couple years were laced with regret that he knew he would be missing so much, and we’re left with a pretty big hole in our lives, missing our hero.)  One of the items Dad earmarked for DB was a small Craftsman woodworking bench that he had placed along the back wall under his tool rack.  This last Memorial Day we made the long trek from Maryland to Colorado and this bench was one of our pieces of precious cargo.
 
We removed the old Gorilla Rack bench and broke down several of the shelving and drawer components to repurpose in DB’s new bench area.

About a month ago we made a few repairs to the salvaged drawer cube and box shelving unit.  We placed the drawers on the bench and secured them in place with some heavy duty carpet tape, and placed the shelving block on top of an old metal filing cabinet.  The boy has quite a bit of storage space with those drawers, shelves and filing cabinet now.  After a bit more shop organization on my part we’ll clear out a space for him on the lumber rack as well.

A few weeks after setting up the bench we added a small pegboard section, fastened to the side of the shelving block.
 
And just this last weekend we took advantage of the blank wall above the workbench and added another section of pegboard.  He’s a big fan of spring clamps…and it shows!

Eventually, when he’s ready, we’ll add a magnetic tool bar for some chisels and modify one of the storage cubbies to store his hand planes.  A while back I picked up a Groz block plane as well as #3 and #4 bench planes for him to get started with.  Now that he’s got a working vise with bench dogs we may have to start ramping up our hand tool lessons.

I get excited with every step he takes in learning something new in woodworking, and that he seems to enjoy it so much.  “Helping” my Dad was such a key set of moments for me growing up and it’s a whole other level of joy to be experiencing it on this side of fatherhood.

So get out into your shop and carve out that special little space that will allow your budding woodworker to start dreaming up something amazing.  Just don’t be surprised if the first designs involve four pounds of nails and half a bottle of glue…I know mine did!
Pete


Sunday, July 14, 2013

Pete’s Take on Piet


This project is a little blast from the past for all my new friends over at the Mid Century Modern and the Rebuild|Restore|Reproduce groups on Facebook.

This piece is an interpretation of Piet Mondrian’s work that I made over four years ago in my garage woodshop in Albuquerque, NM.  It has since traveled with us to St. Paul, MN and now hangs on the wall of our little loft here in Lone Tree, CO.
 
It all began with a spark of inspiration that occurred at the Tempe, AZ Ikea store.  I saw these black, metal CD racks and the thought of using them to mimic the lines in Mondrian’s work (in 3D) just hit me.

I wanted to make a piece that was interactive, so I cut four panels from some left over cabinet-grade plywood and installed three double sided cleats on each panel.  (Stay tuned to see the cleats in action.)

The next step was to prime the panels.

Then it was on to some VERY careful layout using painter’s tape and craft paper.  This process required some real attention to detail to maintain a specific grid pattern.

Hanging the piece requires four small French Cleats all evenly spaced and level.

With the cleats installed on the wall each panel can be hung using one of the three mating cleats on the back.

Having three double-sided cleats on each panel allows the piece to be arranged in many different configurations.  This is where the precision of the cleat placement and the measured grid of the color fields really pays off.  Each panel can be placed at differing heights and can be flipped upside-down.  Here are a few examples from our old home back in Albuquerque.


Part of the inspiration of using the CD racks was to create a 3D effect.  As you view the piece from different points in the room, the “lines of the painting” shift, the color fields are broken and the wall becomes part of the painting.

I definitely like the piece more on our orange wall here than on the flat, white wall of our older home.  I think it adds a new twist with a color that Mondrian did not use in this series of paintings, and the whole piece just pops off the wall rather than blending in.

Thanks for looking, and if you’re interested in one of my latest pieces that incorporates salvaged shop materials, you can check it out here…
http://secondwindworkshop.blogspot.com/2012/11/shop-art.html

 Pete


Saturday, June 29, 2013

Woodworkingless Vacation

The family is winding down a wonderful week away from it all…including woodworking.  We wrangled another family into joining us up in the mountains of Granby, CO and have had a fantastic time away from work, TV (except for a couple Stanley Cup games) and hustle and bustle of the big city.

There were several times throughout the week when I thought about the shop and the projects that I have in the works, and there were other times when I would see something that would inspire me and make me want to tinker with a new idea in the shop.  Those inklings were pushed aside quickly though.  As much as my mind tends to wander off toward woodworking there was no competition to the amazing things I witnessed on this trip.

The Mighty Quinn discovered his hiking legs and pushed through several long adventures like a champ, discovering rocks, bugs, chipmunks and the oh so natural feel of a stick in your hand while blazing new trails.  He growled like a bear or howled like a Lobo at any other travelers we encountered.  He’s quite formidable!
 
Danger Boy lived up to his name and then some.  The boy has very little fear and will dive into almost anything!  I had a hard time keeping up with him at times, and found myself drawn back into my own memories of tromping through the woods of Maryland and Virginia, or exploring the deserts and canyons of Nevada and New Mexico.  I had forgotten so many of my own adventures until this trip, and this daredevil brought them back to light.

And just when I thought I couldn’t be any more blessed…I look over to see this stunning beauty sharing this whole experience, living in these wonderful moments with me.  My boys would not be who they are without the grace and love of this amazing woman…shoot, I wouldn’t be who I am without the grace and love of this amazing woman!  We would be three lost knuckleheads for sure!

As you look out over the summer on the horizon, dreaming of time off to get into your workshop (or studio, or craft room, or dark room…) make sure there is time to appreciate and celebrate those few people who inhabit the most special places in your heart.  Sure they’re proud of your hand-cut dovetails, your amazing painting or that hand woven masterpiece, but what they really crave is time and love.  Get out of the shop from time to time and be generous with the time and love…oh, and look at a few mountains along the way too.


Pete
 

Saturday, June 22, 2013

The Long Road Home

The last couple months have been packed with quite a bit of business travel, however, one trip was very absent of the day job’s influence.  A few weeks ago I made the trek back east to Maryland for Memorial Day.  This was the first Memorial Day without the hero of our family…our Dad.  My youngest sister lives there in Maryland and my other sister came up from Georgia so that we could all visit Arlington together with Mom.

We spent a fair bit of time at Dad’s grave remembering, telling stories, hugging, crying and laughing.  The flags were placed at every grave, and off in the distance you could see the movement of wave after wave of Boy Scouts placing roses on every headstone.  I failed to notice the day we laid Dad to rest…Arlington may be one of the most beautiful places on earth.  Thousands upon thousands of our heroes all placed in rows that echo the focus and precision with which our bravest lived their lives…and saved countless others.  I was in awe.
 
The second purpose for the journey was to collect many of the things from Dad’s shop that I would bring home to my own.  Dad was a woodworker, a craftsman of skill, precision and passion…and he taught me at every chance we had together.  For almost 20 years every trip back home included woodworking lessons.  Many times we would pre-plan weeks before I arrived.  I can recall his voice and his words in almost every task I execute in the workshop.

My youngest sister was gracious enough to loan me her truck for the trip back to Colorado, and my Mom and other sister were brave enough to drive cross country with me to bring this load of precious cargo home…and then drive back!  I cannot thank them enough for delivering my Dad’s treasures to me.

I could proudly list the contents of an entire pick-up bed of tools, jigs and wood that we brought on our journey, but there was really only one thing that I needed to come home with me.  While I’m very grateful for routers and sanders, wood slabs and a mortiser…which I’ll enjoy using for years to come, the whole, long drive would have been worth it if all that came with me was this…
 
This is where Dad held court in his workshop.  I helped him build the doors and frame the top at his little shop down on the Potomac River almost 20 years ago.  This bench cabinet was built to match the height of the table saw and served as an in-feed surface and storage for all things needed to use the saw.  While specifically designed for this cause, complimenting the table saw would not be this treasure’s greatest purpose.

For two decades woodworking and life happened around this cabinet.  There were many woodworking lessons, but even richer were the conversations…memories, our marriages, raising kids, politics, money, war, love and life.  We were sitting at this cabinet the first time he told me about Viet Nam, and the first time I ever saw his eyes well when describing the heroism of an Airman who threw himself on a loose phosphorous bomb to save the rest of his crew.  I met those parts of my Dad that he was ready to introduce me to right here at this cabinet, in this chair.

There is a patina on the bench top where he used to sit, a well worn surface where his hands and arms rested when he sat there.  There are cuts, nail holes and hammer dings from all of his grandchildren.  The grain of the plywood top is raised by the moisture of many Maryland summers and the sweating beers and coffee drips that left countless little puddles.  Needless to say it will never need sanding.  And always at the ready was “the chisel.”
 
He kept it razor sharp and probably used it on almost every project for little touch ups or fine tuning any joinery.  He had nicer chisels, but this was the go to.  Some variation of, “Oh, hold on…hand me the chisel Bubba” was spoken to me probably a hundred times over the years.

And so now his cabinet is the anchor of my shop, lined up behind my table saw ready to serve the next crew of Harbin woodworkers.  I’ll be giving the lessons now and hopefully can share even half the wisdom with half the grace the Dad did.
Pete