Pages

Monday, April 30, 2012

CO Workshop Update #13 - I've got it pegged!

Danger Boy and I made our weekly pilgrimage to Home Depot to re-stock our supply of screws and secure a sheet of pegboard for the workbench along the back wall.  I had plenty of scrap 3/4 inch plywood on hand so the pegboard tool rack went up pretty quickly.
 

I also noticed a little bit of wracking movement from front to back on the bench…not much, but left over time it would continue to magnify.  I added a couple panels on each end to lock down any movement in that plane.  Now the bench is rock solid.  I can’t make it move now, even with some considerable force applied.


The Caps squared off against the Rangers on Saturday in Game 1 of the second round in the Stanley Cup Finals.  DB and I made a run to Sam’s Club to pick a few things up before the game and ended up bringing one of these rolling tool carts home.  The Caps ran out of gas in the third period, but the tool cart came together great.


It’s a nice size and the heavy duty casters are very smooth.  I’m planning to use the cart as a multi-function rolling bench.  The top two drawers are loaded up with all of my sharpening supplies, both for the bench grinder and my water stones and Scary Sharp paraphernalia.  When it’s time to sharpen, I’ll move the grinder, or the glass plates to the bench-top and roll the cart to whenever I want to work.  The third drawer holds all my scroll saw gear…same story…when needed I’ll load up the scroll saw and roll to the best space to work.  The large bottom drawer is filled with sanding belts and drums for the Ridgid oscillating sander.  I see myself wanting to work with the sander outside whenever possible, so the cart will make moving in and out of the shop much easier, and having all the accessories already onboard means just having to load up the tool and I’m ready to work.

I also landed on a home for my rolling tool chest.  I’ve got wrenches, Japanese chisels and saws, my circular rail clamps and guides and most of my shop-vac and air compressor accessories tucked away in this chest.


I’ve decided to not cover this small section of the wall with OSB.  There are electrical, HVAC  and plumbing running through this little section of the wall, and none of them are contained within the framing very well.  I’ll go back and remove the old insulation and touch up any gaps with expanding foam.  I’ll then add some new insulation, with some strategic cuts to work around all the utilities, and cover this section with some heavy gage plastic sheeting.
Hopefully all of my adjustments will prove more effective than the Caps' efforts in the third period.  Good thing for the Caps it's best of seven!

Wednesday, April 11, 2012

CO Workshop Update #12 - I'm Going to Need More Beer

Welcome back to Fine Woodworking with 2X4s and OSB!  OK, so it’s been a while since I’ve posted, but there really has been quite a bit of work done down in the shop.  I was able to unpack several more boxes and I’ve now got about 95% of my lumber collection stored properly.  I’m still tinkering with a few ideas for some of the longer stock.


While I haven’t completely committed to this location, I did find a place to park the router table.  Right now I’m thinking about keeping it here next to the drill press and storing my router accessories up on the shelf there on the wall.
 
The table is an open design, and I’m thinking of enclosing it to contain dust and wood chips.  Now that I’m down in the basement dust collection/containment has become much more important.  My Dad and I built this table several years ago when they visited us in Albuquerque.  A few weeks after their visit I received a package in the mail…surprise!  Dad built this amazing fence for me!  It’s been a great addition with lots of adjustability and T-slotting for attaching feather boards, jigs and stop blocks.  Another nice feature is this opening in the back of the fence.


I’m playing with the idea of building a detachable dust shroud so that I can hook the shop vac up to the fence to remove any dust and chips right there at the bit.  When I was working in garages the dust wasn’t much of an issue.  I usually had the router table right there at the garage opening and would just have the door open while routing.

The biggest victory in the battle to organize the shop was the addition of a storage/work bench along the back wall of the shop.  Technically that wall runs along the side of the house, but looks like the back of the shop.  So the side is the back and the back is the side…the ceiling is actually the floor…and your seat cushion can be used a floatation device.  Got all that?

Here is the new bench in the planning stage.  You can tell it’s the “planning stage” because I’ve got the laptop out, a bag of pretzels and a beer…all the essential planning tools.

I decided to build the bench using some modular frames, so everything was cut to size on the table saw.


The off-cuts were quickly scooped up and sanded by Danger Boy.

He’s all about sanding things now.  Surely there is a way to harness this power for good!  He even checks to see if he can still feel the ridges in the end grain.


With the scrap sanding well cared for by the boy, it’s over to the workbench to start building the frames.


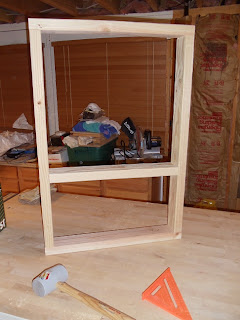
Here is one of the completed frames.


I built four of them to frame out an eight foot bench.


The frames were joined into one bench unit with 2X4 stretchers.

3/4 inch OSB makes for some really beefy lower shelves.  Each shelf is screwed into all four of the frame units, adding to the overall strength of the bench.


I doubled up two pieces of the OSB for the top to give the bench a heavy, flat work surface.  This one will be trimmed out just like the top over on the drawer unit bench you saw in a previous post.  The top layer will be removable should it ever need to be replaced.


You can see that I left a lot of height for that first shelf to accommodate several of my bench-top tools.  I measured them all and the Ridgid sander was the tallest, so that shelf height is based on storing that tool specifically.  The bottom shelf is just the right height for storing smaller things in boxes…in this case Grain Belt Nordeast boxes.  The problem is that I only have a few of these boxes from what became my favorite beer during our short time in Minnesota.  For any of you up in the Land of 10,000 Lakes that might find yourselves making a trip down to Denver, feel free to bring a few (dozen) boxes with you…preferably with the beer.   I can’t have a mismatched set of storage boxes, right?

Next up will be a pegboard rack to fill the space between the bench top and the wall shelves.  I’ve got room for an 8’ by 32” run of pegboard in that space…and now I’m wondering why I even bothered to paint that back wall.
Pete