Pages

Monday, January 13, 2014

Which Box?


This week’s box plan had changed several times over the course of the week.  I was originally going to try my first sliding lid box.  I spent an evening mulling over various wood species, contrasting colors and grains, as well as size and design.

Then it happened…it was just a short Twitter conversation with Chris Wong of Flair Woodworks that set me off on another path.  Chris asked, “What is the value of a box that doesn’t have a bottom?”  Well, that got me thinking!  For those of you who don’t know Chris…he asks a lot of those types of questions.  (His website is also definitely worth a look!)

With this interesting thought rattling around in my noggin, I set out to consider a box with no bottom and what purpose it might serve.  (Queue eerie foreshadowing music here…)  While my intent was to pursue this bottomless box, I had another project awaiting completion that I also put my mind and hands to.

I was making good progress on both projects, with the bottomless experiment being conducted with some left over sticks of Cherry from a previous endeavor.

I’m now about 70% where I want to be with this exploration and have a significant amount of the construction completed…not ready for prime time this week though.  I gave up some Sunday shop time to go help my brother-in-law with some really big boxes…kitchen cabinets!  I even got to build a jig and put the Lie Nielson No 4 ½ bench plane into action.  The Alder cabinets look great in their kitchen.

Undaunted though…I do present a completed box for this week’s challenge.  Here we have another offering from those old salvaged dressers.  The box is Oak with Cherry corner keys and a Karelian Birch veneered panel in the lid.  That Karelian Birch piece is from my first attempts at pressing veneers (Pressing Matters) and veneering onto a substrate (First Veneered Panels.)  Feel free to check out my previous links.   I’ve used those processes several times with great results.  Proof that you don’t need to spend a lot of money to start using veneers on a small scale.

I chose red felt to line the bottom, and the finish is hand rubbed Danish Oil.

This box is designed to hold a break-down candle holder, also constructed from the recycled Oak dressers.  (Break it Down)

There is room for the disassembled candle holder and half dozen tea-light candles.

Stay tuned to find out what happens when the bottom falls out.

Pete

Sunday, January 5, 2014

Box-a-Week Challenge - Number 1


I wrapped up the first box in my 2014 Box-a-Week Challenge yesterday…after a heavy dose of shoveling snow!
 
This offering was built with the Oak I salvaged from some old dressers that belonged to Jill’s parents and grandparents.


The corners are mitered with Walnut keys and the lid includes a Maple burl veneered panel. My original intent was to attach the lid with some 5mm barrel hinges, however I ended up settling on some basic brass hinges I was able to find at Home Depot.
 
I had made a little placement jig for the barrel hinges in an attempt to align them precisely.

There must have been the tiniest amount of slop in the fit, or just enough offset when the jig was reversed.  Once I tested the hinges…

Fortunately I had some Walnut dowels and was able to fill the attempts at the barrel hinges…matching the Walnut corner keys quite nicely.  The box bottom is lined with green felt.  Not only do I like the look of the felt in the bottom, I like the way it changes the sound of the box when it's being closed.

The finish is three coats of hand buffed Danish Oil.  It really warms up the Oak, but also brings it into the same tone as the veneered lid panel.  Next time I use that veneer, I’ll couple it with another wood of a stronger contrast.

We’ll see how long this box survives.  As I write this Denver is covered in snow and we are without a furnace (motor has seen its last days) so the fireplace is blazing and the space heaters are cranking.  It is 6 degrees out right now with an overnight low of -1 expected, but we’re holding up pretty well.  The furnace tech will be back tomorrow to replace the motor and save this box from becoming fuel!

Pete

Sunday, December 29, 2013

2014 Box Challenge


It’s not a resolution!

As a way to celebrate my 100th blog post and ring in the new year, I’ve decided to give myself a woodworking challenge.

Some of my favorite projects to build have always been boxes.  They are a great way to practice techniques and joinery on a small scale, they make use of smaller scraps and off-cuts of what is sometimes expensive wood, and they make great gifts.  The boxes I have made over the past few years have given me my first exposure to topics like keyed miter joints, veneering, inlay and bent lamination.

There is just something about a box that invites a story, or the expectation of a story.  Almost everyone I know has some old box (or other container) floating around in their possessions that belonged to someone special, perhaps preceding them by two or three generations.  Acknowledging that the United States is still a fairly young country, many of us have relatives that came to these shores from all over the world…usually with very little…about what might fit in, say, a small box.

We have stories of our grandparents and great grandparents coming to the U.S. with a sack of clothes and a small collection of precious things.  Maybe they were pictures…medals of family heroes…a special piece of jewelry...a rock, twig or leaf from “home”...maybe even the only few cents to their name, tucked lovingly into a little box that hid in that sack of clothes.  Their careful selections of those choice items that meant the most to them traveled across the world, protected by wood, leather, cardboard or tin.  The thought that I might build a box that serves someone well beyond their own years is very inspiring.

I’ve never been a New Year’s Resolution kind of guy, but I do have a desire to spend more productive time in the shop doing things that inspire me…so, I’m challenging myself to build a new box every week throughout 2014 and give them all away as gifts.

I’ve got a little bit of a cheater’s head-start in that I have a few unfinished box projects in various stages of works to help get my mojo going again.  J  I’ll start with knocking those out first and then move on to new designs.

Stay tuned for Box #1 to be revealed on Sunday, January 5th.
Pete
 

Monday, December 9, 2013

Krenov Comments - Part 3


"I think that I’m fairly proud of the fact that I have not changed because of material conditions – that I have not adapted myself to the marketplace and said, “I’ve got to make things that I can sell,” instead of “I’ve got to make things that I can like and other people hopefully will like.” In other words, I can still look in the mirror and the guy I see there – he’s not good looking, but he’s still the same guy I used to know." – James Krenov

Over the years, as I’ve read more and more about Old Jim, I’ve really come to appreciate his humor, his insight into doing what you love and his take on drawing your own line in the sand about what’s important to you.  A journey through those first few chapters of “A Cabinetmaker’s Notebook” reveals Jim’s humble beginnings.  Tight budgets and tight spaces were a common theme as he launched himself on his woodworking adventure. 

The fact that he emphasizes not playing to the market sort of flies in the face of most of the sales and marketing advice we often hear…especially when trying to keep the lights on and your belly fed.  His tact even strays from what many have taken as business gospel…find a need and fill that need.  While many successful endeavors have been launched in that vein, Jim takes things in another direction.  His life was a focused effort in perfecting the construction of designs that spoke to him.  In doing so he created works of art that celebrated and honored the material for himself.  The resulting pieces were then admired and desired by many.

Did Jim actually, unwittingly, find and fill a need as dictated by the market…or did he produce works with so much passion in the craft he loved that the results couldn’t be anything less than amazing to those who saw and bought them?


Thursday, November 21, 2013

Getting Ready for the Woodworking Show


This weekend the Woodworking Show comes to Denver and I’m looking forward to a little extra time off from work and down in the shop.  It’s been a busy few months and the show comes at just the right time to recharge my woodworking mojo.  The snow is falling and I’m home today as we have a new garage door being installed as I write.  The show doors open tomorrow at noon…only 21 more hours to wait!

I’ve been browsing this year’s seminar list and am excited to see that show stalwart Jim Heavey (Wood Magazine) will be in full swing with three different talks on cabinet construction, doors and drawers.  He’s, by far, one of the best reasons to attend the show.   Back again this year is Andy Chidwick (The Woodworking Coach.)  I really enjoyed his talks at the last show on design, creativity and sculptural work.  It’s good to see him on the docket again.  Andy lends a spark of creativity and credibility to the show that was beginning to fade out a few years back.  The schedule is rounded out nicely with the likes of Roland Johnson (Fine Woodworking), Bradley McCalister and Bob Settich (what woodworking magazine has this guy not written for?!)  I should have no problem filling a few days with seminars and a lot of pages with notes.

As I review the list of classes/seminars, I spy several new faces that I’m looking forward to seeing as well.  This year Marc Adams (Marc Adams School of Woodworking) has signed on and is making his way around the country with the show.  His talks are a full three hours (four different topics) and are paid seminars for an additional cost.  I haven’t decided yet, but I am considering attending one of his sessions…”Methods of Woodworking” or “Joinery.”  The cost is $50 per session, but hey…it’s Marc Adams.

I’m also looking forward to visiting the turning area of the show.  This past Father’s Day I received some new turning tools that I have yet to try out.  I’ll be spending some time with the folks from Easy Wood Tools for some hands-on practice at the lathe.  Needless to say…the tool vendors will be on hand with all their temptations.  Pray for me…my wallet…the boy’s college funds…

Three years ago I blogged about being a little disappointed with the show when I was finally able to attend them up in Minnesota (The Not So Big Show) however, there has been quite a spark of redemption starting with the last Denver show back in February.  New ownership has really started to revive excitement around the show and make it an event worth attending.  For any of you fellow Coloradans planning to attend the show, hit me up in the comments here to let me know when you’ll be there.  I’m planning on attending all three days.

The guys are almost done with our new garage door…let the long woodworking weekend begin!
Pete
 

Sunday, September 8, 2013

Nihon no surudoi nomi!

I really hope Google Translate can be trusted and that I haven’t just declared that I use goose fat for deodorant or that I drive a hairdryer to work...only one of which is true.

A couple weeks ago I took my first crack at using barrel hinges on an Oak box project.  My measurements were just a hair off so the lid didn’t line up perfectly with the box when closed.
 
After kicking the cast iron base of the drill press...much harder than my foot by the way...I set my mind to salvaging the box.  After all, there is a pretty spiffy looking Maple burl, veneered panel in the lid.
 
Because the offset is so slight one’s eye cannot really tell that the positions of the holes aren’t symmetrical, so I opted to plug the holes with Walnut dowels to match the corner key splines.  I can just hear Jim Heavey now, telling me to “Shut up!”

After gluing and trimming the dowels I needed to pare them down flush with the surface of the box wall.  The box material is only 3/8 of an inch thick so I didn’t want to risk any rocking with a block or chisel plane.  Instead, I reached for my nihon no surudoi nomi.  To you, that means I pared down those dowels with razor sharp Japanese chisels...or a hair dryer.

It’s been a while since I used my Japanese chisels as my Marples and Stanleys are the go-to chisels out on the bench.  I chose the Japanese chisels because of the position of the blade in relation to the handle.  I wanted the length of the chisel iron to ride flat along the wall of the box and allow for some control to skew and draw the edge across the end of the dowel.  They cut like a dream!  Even end-grain Walnut was no match for these keen wonders.  Then it hit me...I had snapped a few photos a while back when I was sharpening and setting the hoops on the handles and still hadn’t shared them here on the blog.  So grab some popcorn, sit back, relax and enjoy the show.  Well, maybe don’t sit back too far.  You still have to read and work that scrolly, wheely, thingy to see the pictures.

Setting the hoops onto the handles has to be one of the most frustrating tool prep exercises I’d ever done.  I read the booklet that came with the chisels and did some follow-up research online.  The process of hammering the sides of the handles to compress the wood so that the hoops could slide onto the end...not very effective for me.  Maybe I was a little too impatient, but I was really wailing on one of those handles and it didn’t seem to have much effect at all.  I ended up using a carving knife to sneak up on just the right width for each handle, followed by some very light sanding.
 
Once all the hoops were set, with just little bit of the handle protruding past the hoop, I was able to use the hammer to preen the ends.

With the ends set, it was on to flattening the backs.  One of the unique features of Japanese chisels is the hollowed back.  There is much less material to remove when flattening the backs, so the process is pretty quick compared to western chisels.  I used the sandpaper on glass method...Scary Sharp!

Until last year I used to do all of my sharpening with sandpaper on glass or water stones...that is until the Work Sharp 3000!  Sounds like something from the late night infomercials in Robocop, but it works great.  I didn’t get it for a dollar though.

Another difference with Japanese chisels is in the make-up of the chisel iron.  There are actually two layers of steel, one hard (at the cutting edge) and one softer (along the top of the iron.)  I had to be extra careful using the Work Sharp to avoid heating the softer layer too quickly.  It took a little longer than when sharpening my western style chisels, but the edges came out razor sharp...or covered in goose fat, depending on translation.

Included in my set is a very thin, 3mm (less than 1/8 of an inch) chisel.  This one did not fare so well on the Work Sharp.  The temper is fine, so no damage done to the steel itself, but the end is no longer square.  You can also just make out a bit of a facet in the surface of the edge.  I’ll have to rig up a jig to hold the narrow iron and fix this one on the sandpaper or water stones.

As I said...they cut like a dream!  Those Walnut dowels never had a chance, and no unsightly gouges or scratches left in the surface of the Oak.

They also served me well a couple months ago when trimming some Wenge inlay banding on another box project.  This was face-grain, but Wenge can be very splintery and unforgiving.  Just look at those smooth shaving curls.

I had trimmed the inlays down quite a bit with block and chisel planes and then fine tuned the final cuts with the hair dryer...uh, Japanese chisels!

I was fortunate enough to acquire this set several years ago at a special discount price.  At the time I thought it was a bit frivolous.  In the end though, I’ve come to appreciate the unique qualities of these chisels and on many occasions they have been just the right tool for the job...and they make my armpits smell terrific!
Pete
 

Sunday, August 18, 2013

You can never have too many, well you know.


One thing is for sure…the longer you’re a woodworker, the more and more clamps you’ll accumulate.  They come as gifts, they tempt you on the shelves in stores, you see Norm using them on TV…and then somebody online shares a link to a sale or a once-in-a-lifetime coupon for so much off that it would be financially irresponsible for you to not buy them!

I had amassed quite a little collection, and believe it or not, I actually found myself coming up short on a few glue-ups over the years…especially once I started pressing some veneered panels.

It’s not that we don’t have a lot of clamps.  It’s that we usually don’t have a lot of any particular clamp when we really “need” them.  Due to a massive sale many years ago I was able to acquire quite a pile of Bessey K-Body Parallel clamps…and I do mean massive…think 75% off the normal price.  Like I said, I didn’t want to be financially irresponsible...so I may have bought a dozen...or so.

Fast forward a few more years…a few birthdays and Christmases later…then layer on another stack of clamps that I brought home from Dad’s old shop a couple months ago, and you just might be thinking, “If anyone has enough clamps now, it’s that knucklehead Pete!” 

I won’t even try to argue with you…well, not until that next project comes along that finds me scrambling for just the right clamps to execute a “precision” glue-up!

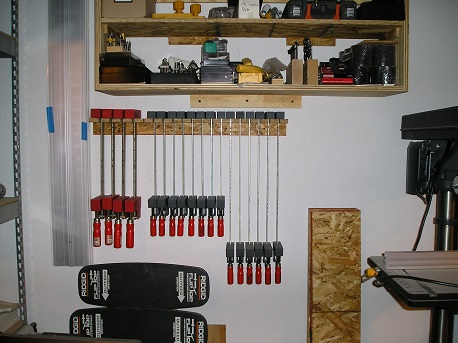
Yesterday I finally got tired of moving stacks of clamps around the shop from place to place when I needed to work, or kicking over those that were leaning up against the bench or cabinets.  Free wall space is starting to become a rare commodity in the shop, but I was able to tuck another rack in for some of the shorter K-Bodies and UniKlamps.

This freed up a little space on the existing wall rack to be a bit more organized with the various sizes of clamps that seem to be multiplying in my shop.

Previously, I had been keeping the long K-Bodies (40 and 50 inch) on rolling clamp racks.  These were great in the big, garage shop back up in Minnesota, but down here in the basement shop floor space is becoming almost as precious as that rare, open wall space.  Again, I found myself frustrated with having to move these rolling racks around the shop to work…sometimes even to get from one side of the shop to the other.  No, that still doesn’t mean I have enough clamps!

At my wit’s end, I looked to the heavens and cried out in desperation…OK, maybe I was crying because I nailed my shin on that dang clamp cart again!  There it was, the answer to my prayer…

A few quick stretchers placed across the ceiling joists, and voila!  Not only are those big, heavy clamps out of the way, but they’re perched quite handily right above the work table where they’re most likely to be used.

That means that these shin-busting, toe-cracking, knee-biting...uh...I mean wonderfully, useful rolling clamp racks will be finding their way onto Craig's List, to bless the shop of another sucker...er, woodworker!

Side note:  I wrapped up all this clamp organization and starting writing this entry last night.  As I finish it up today I see that our good buddy, Tom Iovino, over at www.tomsworkbench.com has just posted his weekly poll entry on…you guessed it…clamps!   Head on over and share your clamp situation in the poll.


Have a look at the options.  I bet you can guess how I voted!

Pete