Pages

Sunday, January 27, 2013

Marked for Death


OK, maybe not death, more like inconvenience…and Steven Seagal will not be featured anywhere in this blog entry.

It took a fair bit of time, but I’ve marked (for death) all of the dowel pin locations on each of the parts for the Rietveld Red Blue Chair.  I went over every piece, identifying the best surfaces and marked (for death), not only the dowel pin positions, but the orientation of each part as well…tops, backs, inside/outside, etc…
 
When it comes time to drill the holes for the dowel joinery I’ll be able to take advantage of Rietveld’s intention of making these chairs easy to mass produce.  Since most of the parts are 30mm X 30mm, the holes can be drilled with the same fence set-up on the drill press.  With that I reached for my trusty set of Forstner Bits and selected the 5/8 inch bit to match the dowel stock I picked up at Home Depot.


I marked (for death) the center, positioning line on a left-over piece of the Beech chair stock and aligned the bit and fence to drill the centered holes.


After drilling my first test hole I grabbed the dowel stock and tested the fit.  Uh oh…either this dowel is not 5/8 inch wide, or this is not a 5/8 inch Forstner bit!


I immediately began to curse Home Depot…those guys mis-marked (for death) these dowels!  A quick measurement of the hole’s diameter though revealed the true nature of the problem.  This is a 3/4 inch diameter hole!  I can’t believe I didn’t notice that before I started growling at Home Depot.  A trip over to the box of Forstner bits confused me even more, until it finally hit me…take a look at how these bits are marked (for death) in the box.  (Click to enlarge.)


That’s right…the 3/4 inch bit is sitting right smack-dab above the 5/8 inch marked (for death) slot!  Now in Craftsman’s defense, the bit sizes are clearly labeled on the shanks, and the plastic, protective covers for each bit are also labeled with the bit’s correct size, however the marking (for death) on the box is where my mind went when selecting the appropriate bit to use.  I sure hope I remember this the next time I pull this set out!

With the actual 5/8 inch bit set up and ready to go I drilled another hole in my scrap piece.  The test fit with the dowel stock was much better this time.  Funny what that extra 1/8 of an inch can do to mess things up.  Home Depot isn’t entirely off the hook though…their 5/8 inch marked (for death) dowel is just a hair under width, so the fit isn’t as tight as I’d like it to be.  I ran a caliper along the length of the dowel and the width does vary just a little as I worked my way down.  The kicker though…it’s never a full 5/8 inch wide anywhere along the length.  The dowel is Poplar, so it may swell a bit with glue, but I’ll definitely need to do a glue-up test to be sure.  If that test isn’t successful though, I’ll have to find another source for the dowels…and this time I’ll be packing my dial caliper to be sure I don’t fall prey to any more mis-markings (for death.)

On a less deadly note, I was able to find a picture of a Red Blue chair in the process of being built.  This fellow (G Najran) built several 1:20 scale models of the chair and made several jigs to aid in construction.  I would have to scale things back up to full size, but there may be some merit in the way he’s building these models that can translate to my full-sized reproductions.
 
I also found a great shot of the original prototype chair that led to the final Red Blue design.


Tune in next time to see if I can survive the continued construction of these “sillas de muerte!”

Pete
 

Monday, January 21, 2013

A Pile of Chairs


Check out the younger Mr. Rietveld (around 1916-17) in front of his furniture shop with his staff.  He’s sitting in his original, prototype design of the now iconic Red Blue Chair.  This is a few years before meeting Piet Mondrian and other members of the De Stijl movement.

My own red Blue chair build continues to move along.  Work time was curtailed a bit this week by some needed focus on clean-up and some shop organization though.  I was able to clear out some of the space at the back end of the workbench that will allow me to move the bench and table saw down a bit toward the back end of the shop.

While it hasn’t been a huge problem there have been a couple of times I’ve gone to battle with the support column that stands a couple of feet to the left of the table saw.  It doesn’t impede working on the saw so much as mobility around the shop.

Despite having to dance around the pole (whoa, whoa, whoa…don’t go there!  It wouldn’t be pretty!  J) I pressed forward on the final sizing of the chair parts.

I squared up the ends and then cut the arm rests to length.

Then it was on to the rail stock that will make up the framing of the chair.

Here we have two chairs, minus the seats and backs.  Sure they look like a pile of sticks now, but soon…the magic of Rietveld’s design!

One of Rietveld’s chief aims was to design furniture that pushed the envelope of modern design, that explored and presented new ideas in fresh ways, and above all made it accessible to the masses.  The key design feature of this, and many of his designs, was that they could be built with easily produced parts…in this case, a pile of sticks!

One of the most intriguing aspects of the Red Blue design, for me, is how bold the chair is in the way it occupies a space when viewed from the front or from a skewed angle.  Moving around the chair and observing it from the side makes the design as a chair almost disappear.  It becomes a collection of points and lines…a painting on an invisible canvas rather than a piece of furniture.

For almost 100 years now, this specific design has sparked many discussions on what modern design is, what is considered good design, and how accessible modern design should be to the masses.  Many times the Red Blue Chair elicits responses of “love it” or “hate it” which is exactly what Rietveld was trying to accomplish.  He was starting a conversation on design that is still in full swing today.  What are your thoughts…if you dare to share?  Be careful…people could be talking about your contributions to the conversation 100 years from now.

Pete

Monday, January 14, 2013

Rietveld Build Update


With all of the holiday and business travel out of the way I was able to get the Rietveld chairs back on track this past weekend. 

No this one isn’t mine! :)  It is a clever commentary on design and the type of process that folks will sometimes take to shake things up a bit.  (Thanks to new york new york over at the 207 – Play by Play forum on Tommy MacDonald’s site for the link!)


I am, fortunately, relying on Mr. Rietveld’s original design and sketches, but that is no guarantee that mine won’t look like the “Left Handed” version!

I spent some time a couple weeks ago working on the stock preparation and yesterday I was able to finish a good portion of the final sizing work.  First up was to move all of my identifying markings to a non-jointed edge and face joint each of the boards.

Then it was on to the planer.  I took the rough blanks down to about 48 mm thickness.

After another quick trip to the jointer to square up one of the edges it was time to visit the band saw.  I decided to try and salvage as much of this Steamed European Beech ($) as possible, so I’ve resawn the boards to harvest some thin stock for use in future projects.

I utilized the same dust collection set-up that I did with the planer.  I’ve got a Craftsman tool switch that I use with my shop vac that makes things pretty easy.  I don’t know why most vacs just don’t have this kind of feature standard, or at least offer a model that does.  Both Ridgid and Craftsman had offered them many years ago.

I was shooting for a 30 mm thickness on the stock for the chair, so I scribed some cut lines at 32 mm on each piece.  I free-handed these boards on the band saw, staying just proud of my scribe line.

I achieved some pretty nice results using a half inch blade.

When all the boards were done, I ended up with a nice collection of thin stock.

I was able to plane all of these pieces down to 1/4 inch thick, and now have them stacked and stickered under weight.  This will be some nice stock for boxes, drawers or trays in the future.

The boards for the chair parts were then planed down to the desired 30 mm thickness and stacked…where they sat for a couple weeks.  I was pleased to see little or no movement in any of the boards when I went to work with them yesterday.

After a few light passes on the jointer to ensure good, square edges to reference on the table saw fence, I ripped all of the chair stock down to 30 mm, creating the “sticks” used to build the frames of the chairs.  I also ripped the armrests down to a 90 mm width, and then restacked all of the parts.

Next up…cut all of the chair parts to length and lay out the dowel positions on each piece.  The original design calls for 15 mm dowels to secure the joints.  I’ll be using 5/8 inch Poplar dowels…about 1/32 inch larger in diameter than Rietveld’s original specifications.  I’m guessing that Gerrit didn’t get his 15 mm Beech dowels at Home Depot...maybe Lowe's?

Pete

Wednesday, January 2, 2013

Day One Dovetails


Here we go fellow woodworkers!  I started up my Dovetail-a-day plan on 1/1/13…not so much as a New Year’s resolution, rather giving myself a clear run of non-travel days that should find me home and in the shop for the next few weeks.

This post is pretty picture-intensive to show the tact I’m starting with for cutting my dovetails.  Future posts will just include updates of my progress, and any changes I make to my technique…maybe driven by suggestions from any of you dovetail gurus out there (hint hint!)  J

The last time I attempted hand-cut dovetails was probably about seven or eight years ago when my Dad gave me a lesson during one of our trips back east.  I think I cut about a dozen joints during that visit and actually got some pretty good results.  I haven’t hand cut any since that trip, so this new venture is heavily laced with some very sweet memories of my Dad.

Earlier in December I picked up some 1X6 pine boards (3/4” X 5 1/2") from Home Depot to use as practice stock.  Yesterday morning I broke the boards down to one foot lengths.  Each pair of boards should allow me to make three or four practice joints each.
 
With my first pair of boards selected I laid out the tools I’ll need to get the action started.  I’ve got my Veritas Dovetail Saw (14 tpi) and the Crosscut Saw ready to go.  I’m using a round bladed marking gauge and my Dad’s old Lie-Nielsen dovetail marker for laying out the joints.  I’ll also be using my Stanley Sweetheart (750) chisels…a gift from my parents from a couple Christmases back.
 
My old vise did not survive the two moves we’ve made over the past couple years, so it’s been removed and I’m using two smaller, mobile, vises to hold my work pieces.

My first step is to lay out the tails.  I know that this will cause some immediate controversy, but it’s what made sense to me.  J  I set the marking gauge to the thickness of my boards.  Since both boards are the same thickness there will only be this one setting.
 
I then used that setting to mark a line that will denote the length of the tails.  I scribed this line all the way around the board.


I decided to cut a three tailed joint.  This gives me plenty of room to work around the tails while I’m rebuilding my “chops.”  I set a tail an inch in from both sides and centered the third.  Then I marked the waste to protect me from myself!


After the layout it was time to dig in and make some cuts.  My first attempts with Dad were with a Japanese style pull-saw, so this is my first time using the western style dovetail saws.  So far I like both methods.  Perhaps I’ll experiment with the Dozuki again in the future.


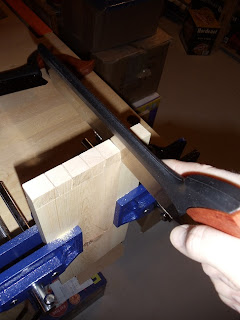
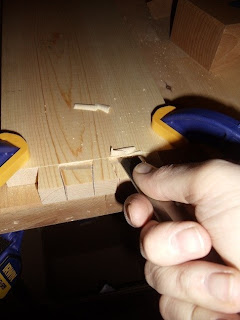
With the sides of the tails cut, it was time to go after removing the waste.  I know that quite a few folks will use a coping or fret saw here, but I’m going to chop out the waste with chisels.  This is a handy trick that Dad showed me all those years ago.  By using the chisel to pare out a small wedge, a little “wall” is created that gives the saw a guide to start making a straight cut.  The scribed line from the marking gauge does double duty here by providing a resting place for the chisel’s edge to sit in before striking it with the mallet.  The wedge is then removed with a light paring cut.


This technique worked really well for me.  It’s amazing how just a tiny, little shoulder is enough to guide the saw true when starting the cut.


I didn’t catch a photo, but did use this same technique to create those little “walls” when I started chopping out the waste from between the tails.


I alternated paring cuts and chopping cuts until I was about halfway through the board.  I then flipped the board over and worked from the other side.  Once most of the material was removed from around the base of the tails, the rest of the waste popped right out.


After a little clean-up with the chisels I used the tail board to mark the location of the pins on the second work piece.


I then followed all of the same procedures to cut the other half of the joint in the pin board…and here it is, my Day One efforts at hand cutting dovetails.


There are some gaps, and I can see where my saw cuts were not a true as I would have liked.  I was pleased with my layout though.  I can actually flip the tail board over and tails will match up with the pins.  It’s not a perfect fit because of the variations created by my sawing, but the joint will slide together about half way and the edges are still aligned.  One thing I did forget to do was time myself. I'll have to put a clock on my efforts going forward to measure any increase in efficiency as well as precision.

This was a great experience and I’m looking forward to practicing a lot more.  I thought about Dad and missed him a lot while working on these.  All that I remembered made me feel better and prouder than even the most perfect dovetail joints could.
I’d love to hear some feedback or input on my technique.  I know that there are many methods out there and that folks use all kinds of variations to produce amazing results.  Thanks for visiting, and come on back!

Pete