Pages

Sunday, February 27, 2011

It was too good to be glue...

It was a busy week at the office, but I was able to work in a little shop time during the evenings in preparation for this weekend’s glue-up project.  First I set up a straight edge fence along the front of the bench.

I used the fence to line up the box parts and tape them together. 

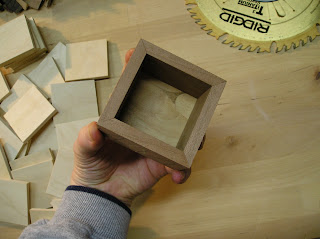
I used blue painters tape because of the good holding strength and it has a bit of “stretchiness” that creates a nice tight grip when the box parts are “rolled” up.  Here’s a shot of the tester box with one of the bottoms dry fitted into the groove.

I was ready to start gluing up the box parts when I discovered what happens when Titebond III is stored in very cold climates.  This was not an issue in New Mexico!

Even after trying to let the bottle warm up a bit in the house the glue was still a chunky, gloppy mess.

This put me off track for a couple days until I could pick up some more Titebond, but I did get all the box pieces taped up and ready for glue.

After re-stocking the glue supply I decided to bring the show into the house.  I set up a small table in the family room, fired up “A Fistful of Dollars” on the DVR and got to work.

Once all the glue was placed, I “rolled” up each box around the bottom piece and taped the last corner into place.

It is key to make sure that last corner is pulled together with some tension in the tape.  This really holds the four corners together tightly while the glue cures at each joint and locks the bottom piece into place.
After each box was glued and taped, I checked them for square and then set them aside for about 20 minutes.  That time allowed any glue that squeezed out of the joints to start drying and getting gummy.  I then removed any excess glue with a chisel…a much better process than leaving it too long and allowing it to harden completely…a  lesson I learned the hard way on the last set I boxes!
Overall, I’m very happy with the progress on these boxes.  They checked out well with the machinist’s square after they were glued and taped.  Many of the chalk markings were blurred, wiped off or covered with tape, so there will be little chore in getting them sorted again.  There are some slight variations in size for small groupings that will impact the sizing of the lids, but I think those can be sorted out fairly easily.

Next up…taking this whole herd of 35 boxes and adding the corner splines, cutting and fitting lids and completing the final details and finish.  I still need to build the spline cutting jig for the table saw...hopefully by the end of this weekend.  I may end up breaking the gang up so that I can finish a small group and get them sent off to Maryland for the silent auction fund raiser.
I shoveled a light dusting of a couple inches of snow.  Hopefully a little warm up is on the docket for tomorrow.  I’m ready for a little New Mexico to show up here in Minnesota…brrr!
Pete

Monday, February 21, 2011

Wrap Around!

He carries the puck in across the blue line…around the defenseman on the outside and back in behind the net…he’s got the puck on the backhand and cuts in on the post…he stuffs it home!  Put a bow on that one!  He scores on a wrap around beauty that’s fit for Christmas day!

OK, so that’s not the wrap around that occurred in the Second Wind Workshop…not that I haven’t dreamed about one like that though!
This weekend I focused on those last few boxes that needed sizing and the bottom pieces prepared.  After laying out the parts for the Padauk boxes, I set up the cross-cut sled to trim the sides to size.  The first trim cut defined the final size of the pieces.

This set the tone for matching the grain pattern around the corner with the next piece in line.

Once the grain was lined up the next parts could be cut to size…

Once all four sides were cut, the true test of the layout exercise was whether the fourth side wraps around and meets the first in grain orientation.

On the first box…He shoots, he scores!  On the second and third…well, even Gretzky didn’t score 100% of the time.  I was able to trim the two remaining boxes with three matching corners, but the fourth doesn’t quite meet up.  I could have trimmed some more, but would have sacrificed more size than I was willing to give up.  I also could have had a second box with four matching corners, however the third would have had none.  I'll have to think about some creative corner treatment options...maybe a wide corner key in a contrasting wood?
Once all the sides were trimmed, I cut the grooves to receive the bottoms and sanded the inside surfaces.

With all the parts cut a couple of dry fittings were in order.
Here are the special sized Birdseye Maple boxes.  These are made with slightly thinner stock and were cut larger than all of the other boxes. 

And here are the Padauk boxes, with mismatched corners hidden, all fitted together.

About halfway through the weekend…Minnesota decided to become Minnesota again and we saw an all-day snow-a-thon.  That meant transforming the two stall shop back down to one and bringing the truck back inside.  All that extra space was nice for a while.

Turns out that our house is perfectly positioned to capture all the wind and transform it into a swirling, snow dropping, drifting machine!  That drift eventually piled up to over four feet in front of the shop/garage.

I’m not ashamed to admit that we called in a plow this time around!
Up next…gluing up all these boxes and building a corner spline cutting jig. 

Fortunately the glue-ups only require some space on the workbench, which is good because I don’t even have any room to work on my wrist shot with the truck parked inside.
Pete

Wednesday, February 16, 2011

Just Warming Up

Some extra, welcomed, shop time has been in the cards this week.  With the temperatures in the 40’s the last few days, even stealing an hour or so in the evenings has been really nice.  A few nights ago I ventured out to start working on the sanding of the box parts.
I thought I was being clever by setting up the half sheet, pad sander on one of my Ridgid Flip Top stands so that I could sit and sand. 

With the sander clamped to the stand, I fired it up and it vibrated like crazy and was very loud.  The Flip Top can be locked into a flat position, but still has some play between the top and the post.  Lesson learned…I clamped the sander mount to the workbench and set up the sander. 

I also learned an additional lesson to carry forward into future box builds…make all chalk markings on the outside surfaces of the box parts.  I had written all my identifying marks on the inside surfaces, and since those were being sanded I had to re-write all of the info onto the opposite sides of each piece.
Here are a bunch of parts all re-marked and ready to be sanded.

I started with sanding the bottom surface of the box bottoms.  I used 180 grit sandpaper to smooth out the fuzzy plywood surfaces.  I picked up this sanding tip from Doug Stowe’s book, “Box Making Basics.”  He uses the same Porter Cable sander, inverted like this, to do all the finish sanding of his boxes.  It really works well to be able to bring the work piece to a nice flat surface.

Next up were the inside surfaces of the box side pieces.  Now is the time to sand these surfaces prior to assembly.  It’s much easier to sand the inside of a box before it becomes a box!

As I was sanding I counted the number of strokes I made on each piece with the sander.  The idea is to sand each piece the same amount so that any change in thickness is consistent across all of the sides.  After each piece was sanded, I gave them a quick wipe-down with mineral spirits to clean up the surface and remove any of the fine dust left behind.

I did have to lay all of the pieces out to allow the mineral spirits to dry.  When I stacked the first few sets, the mineral spirits were removing the chalk markings on the next piece in the stack.

I left the parts out to dry until this evening.  I restacked all the parts and cleared some space on the bench to work on laying out box parts for the heartwood/sapwood combo Padauk boxes.
First I drew a straight line on the surface of the workbench to use as a layout reference.

I then used that reference mark to align the box sides and ensure that the transition line between heartwood and sapwood will meet around all four corners of the boxes.  I left these box parts a little oversized knowing that I would need to trim some material from the top or bottom edges in order to achieve the alignment I’m going for.
I was able to get a nice layout for all three boxes.  The chalk lines are rough reminders of where I’ll remove material when I’m back in the shop at a more table-saw-running-friendly time.

Tune in next time when we’ll trim these parts to size and cut bottoms for the remaining boxes.  We could see some assembly by this next weekend.  I’m hoping to have these completed by the end of the month, as I’ll be sending some of them off to Maryland for a silent auction, fund raiser that my cousin, Christy, is co-chairing for her daughter’s school.
Pete

Sunday, February 13, 2011

Groovin' on a Saturday Afternoon

We’re having a heat wave…a tropical heat wave…  Well, 33 degrees in February, in Minnesota is practically tropical!  After just a couple hours of prep time with the heater, the shop was actually pretty comfortable to work in. 
Today I broke out the new Freud rip blade my Dad sent to me for my birthday last year.  He and I were discussing the need for a blade with a flat tooth grind to cut clean, flat grooves for corner splines on boxes.  I thought I’d have to special order a blade, but he remembered that Freud had a 24 tooth rip blade with a flat grind.  He called me back about an hour after our conversation and said not to order anything, and that my birthday present was on the way.

I knew I’d be adding corner splines on some of these boxes, so I decided to also use the blade to cut the grooves in the box sides that will receive the bottoms.  Not only does this blade cut a flat bottom, but the kerf is exactly 1/8 inches wide…just the right size for the grooves. 

One of the keys to making this many boxes at once is keeping all the parts together and in line.  To cut the grooves while keeping the parts in order, I marked each side piece with an arrow to indicate the position of the top of the box.

I set the blade for a 3/16 inch deep cut, and set the rip fence at 1/4 inch away from the blade.  I then used the arrow as an indicator in relation to the fence so that none of the parts would get flipped around.  For my practice run I used the cherry pieces I cut when testing the set-up of the cross-cut miter sled. 

The new blade worked like a dream.  Nice clean, flat bottomed grooves…isn’t that a Queen song?  “Flat bottomed grooves you make the rockin’ world go ‘round.”

Once I was happy with the groovy test results I started dishing up box parts, one species at a time.

A little safety reminder here.  When cutting multiples in a repetitive process remember to pay attention to what you’re doing on every cut.  It’s easy to get a little lax when you’ve just cut over 100 grooves.  The last cut warrants the same attention that the first one did.
Now this is what I call gettin’ a groove on!

Once the grooves were cut it was time to start sizing the bottom pieces.  I used the finished sides to measure from to ensure that the bottoms would fit.

The end to end measurement of the length of the grooves came in at 2 and 9/16 inches.  When setting the rip fence on the table saw I laid the sheet of 1/4 inch Baltic Birch plywood (which will be used for the bottoms) against the rip fence and placed the ruler at the edge of the board.  This made setting the width very easy.  I’m looking for a width that’s a little under the full length of the groove.  I want the bottoms to fit snuggly, but not too tight.  They'll be glued in place, so a little room needs to be left for the wood glue.  I backed off a 1/32 of an inch and set the fence for 2 and 17/32 inches.

I made the first rip and then checked it against one of the grooved sides.  That’s the fit I’m looking for.

I ripped a total of four strips of the Baltic Birch.  The next step was to cut square pieces that will become the bottoms of the boxes.  To ensure the parts were square I used one of the ripped strips to set the distance between the blade and a stop bock on my cross-cut sled.

Once the stop was set, it was just a matter of minutes to cut plenty of perfect squares.

The plan called for a rabbet around the box bottom pieces to create a tongue that will fit into the grooves in the box sides.  It was time for another blade change, the third as part of today’s work.  I installed the 40 tooth Oldham blade and a zero clearance insert.  It’s a wide kerf blade that will cut the rabbets I need in just one pass per side.

I set the blade height to 3/16 of an inch and positioned the rip fence to just under half the thickness of the pieces.  This is another one of those processes that requires your full attention to execute…especially when cutting as many as I needed to.  I had a couple of them jump on me when I accidently lifted the piece just a hair as it engaged the blade.  No injuries, but it sure made a loud pop and got my attention real fast!

After finishing the first bottom I did a dry fit on the Cherry test pieces.

The fit turned out great with all four sides in place.  I noticed a big difference between this time around compared to the first run of boxes I made.  The flat bottomed grooves made fitting the pieces much easier.  I remember having to make multiple trimming tweaks last time without the flat grind blade.

With a successful test under my belt I finished up all the bottom pieces. 

The next step for all these box parts is some serious sanding.  There are still another handful of boxes that are varied in size, so they’ll need bottoms cut as well, and those special Padauk boxes will need to be sized and trimmed to capitalize on that stunning grain pattern.
Boy, I may need to run the AC in the shop tomorrow.  We’re expecting a high of a blistering 40 degrees here in the Twin Cities.  I’m sweating up a storm just thinking about it.   Bum, bum, bum…a tropical heat wave…
Pete